Again This Is My Personal Take On Color! It Really Depends On The Situation And What You Personally Value,


Again this is my personal take on color! It really depends on the situation and what you personally value, and in the end practice is your best friend.
links:
genice’s color practices
color palette challenge (one iteration of it; there’s lot of people who made them)
(not mentioned, but helpful)
Patrick (H) Willems’s video essays on color in film; specifically his ones on
Wonder Woman and Marvel
I thought he had one on John Wick too but I can’t find it. If you like saturated colors though, check that movie out!!
those are only a couple of exterior references, there’s lots out there!! so good luck & I hope this helped!!
More Posts from Artrefforsteph and Others
hi!! i actually just got sai and i was wondering if u had any tips for it?? thanks in advance!!
BUTTONS
Shortcut buttons are your best friend. Rework your brushes to a certain keyboard button and remember them, it’s easier and faster than manually changing them.
CTRL-ALT changes your brushes sizes on the spot.
SPACEBAR is to move the canvas but not the drawing itself
CTRL moves the drawing
CTRL-SHIFT moves a layer drawing
ALT is the eyedropper tool if you don’t want to right click.
ALT-SPACEBAR turns the canvas
CTRL-SPACEBAR does the zoom in.
CTRL-ALT-SPACEBAR does the zoom out
H will flip the canvas horizontally, just the canvas.
CTRL-Z Undo
CTRL-Y Not undo
CTRL-F fill in selection
SHIFT additional selection
ALT delete selection
GROUP MOVING

CTRL-CLICK
Click on the layer to select a thing.

PRESERVE OPACITY
In case clipping group doesn’t always help, preserve opacity helps you colour a certain thing.

STABLIZER

CTRL ONLY ON SELECT
The transform tool itself does a lot of things, but press CTRL while in select mod can free deform your selection without having to switch.

CTRL-SHIFT ON SELECT

;w; If you need to know more like brushes and other various things, you can always look them up, but for now I hope this helped !!


I’ve been seeing a lot of Big Hero 6 concept art and I wanted to set a brush to kind of mimic the graphite style of some of the sketches. I don’t have a “fully functional” version of SAI, so I tried to make this as simple as possible.


A master post of Thomas Romain’s art tutorials.
There’s not enough space to post all of them, SO here’s links to everything he has posted (on twitter) so far : 1 2 3 4 5 6 7 8 9 10 11 12.
Now that new semesters have started, I thought people might need these. Enjoy your lessons!
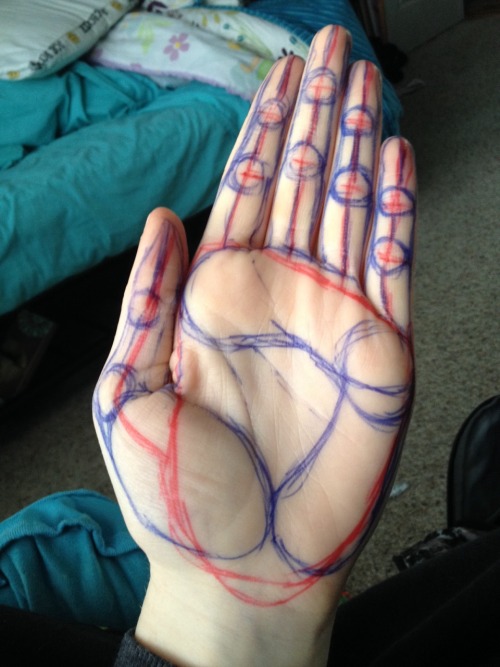
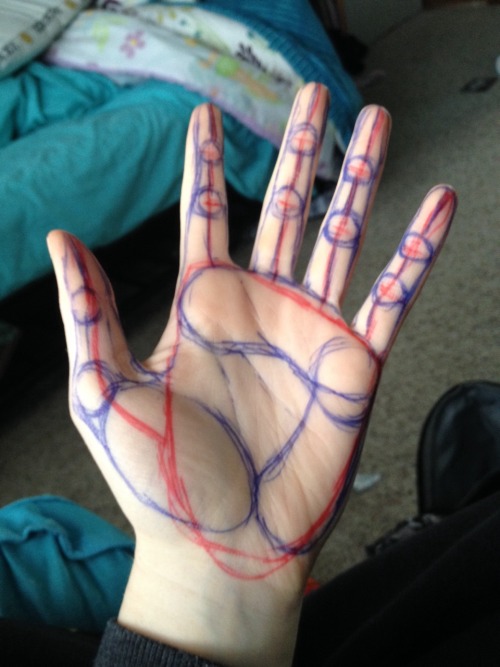
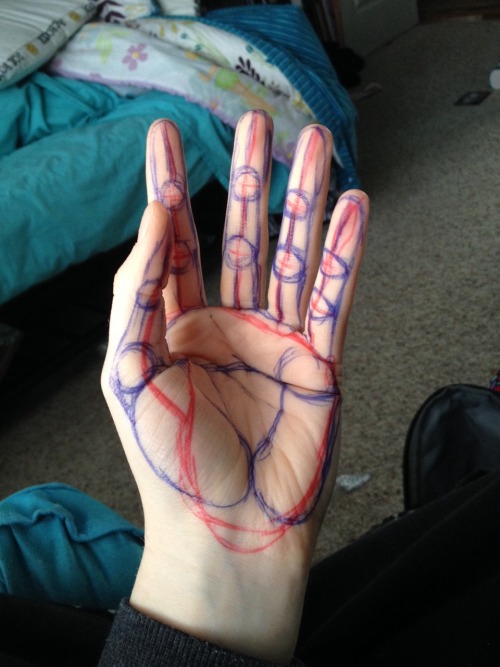

I always struggled drawing hands before anyone told me what to do. So here is a HANDy dandy drawing reference to see the steps on an actual hand. There are three big muscles in the palm. The thumb lump is most important because without it you’ll never even get the shape right. Circle up the knuckles and draw bendy lines (red) to connect them. Make sure the fingers go from medium-tall-short-shortest just slightly (index=>pinky finger). Notice the big red squareish shape around the palm-that’s the first thing I do. Note: every infer has 2 knuckles don’t forget the thumb does too…just in a weird way.


Tuesday Tips - Hair There’s no hard rules to draw hair (or anything for that matter), but the one thing that I try to keep in my mind is that there’s AIR in hair. I can draw it as a shape because there’s hundreds of thousands of them, but I’m also considering the space between them. For example, the volume of dry hair and wet hair will be dramatically different. Also, the way it behaves will differ greatly from person to person. I mostly think about the “weight” of the hair. Longer hair will means that the mass of hair will be heavier and react accordingly. *As always, leave a message if there’s a topic you would like to see covered. Norm

WACOM TABLET DRIVER NOT FOUND - What Do
So, you put your Windows computer to sleep for the night. You come back the next day all eager to wake it up and put it right to work on that thing you’ve been working on and ….
Oh no - you’ve seemed to have lost all pressure sensitivity and high resolution pen tracking! Well, you figure, why not go check the driver settings. Maybe it’s just groggy and needs a little morning reminder? You go to your Control Panel, click on Wacom Properties Configu—
Ah.
Now, you figure, all is lost and there’s only one thing left to do: save your work, close all your programs, and do a full system restart. What a fun time this is.
But HOLD ON! There’s another way! Try this out first before pulling the plug:
Open your Start menu (or press the Windows Key) and simply type “Services”. There will be an icon at the top of your list which appears to be two small gears with the name “Services.” Click that and look what happens next:
Scroll down the list and select “Wacom Professional Tablet Service” from the list of services and click the little “Restart” link in the column to the left. Now simply wait for the service to stop and start itself back up again!
If for some reason, clicking this little “Restart” button makes matters WORSE, the failsafe approach is the manual restart. Double click the “Wacom Professional Tablet” service and a window will pop up.
Manually stop the Wacom driver by clicking the Stop button. Wait for it to shut down, then start it back up again with the Start button once it becomes visible. Once restarted, click OK!
Test your Tablet now in Photoshop. You may have your pressure sensitivity fully restored!
IF NOT, simply close and reopen Photoshop, which will be nice and quick since it (and your work) are still loaded into recent memory. Yes, this isn’t IDEAL, but it surely beats having to close EVERYTHING and restart the whole computer. Especially if you were listening to a good tune at the time.
Now, providing you’ve done it correctly, (really now, how could you not,) you should find your Wacom’s pressure and tracking sensitivity fully restored! AND you’ll have access to the Tablet Properties config app once again!
Celebrations! For discovering such a wonderful little time saver.
:: ADDENDUM ::
As pointed out by Addleton there is a permanent fix for this issue by disabling the service called “TabletServicePen” if you’re using an Intuos/Bamboo or “Tablet PC Input Service” if you’re using a Cintiq.
Disabling this will stop this issue for good – but it will disable all Windows-related tablet functions such as flicks and handwriting, and may make some software such as SAI misbehave on certain hardware. If all you use your tablet for is Photoshop and drawing, it’s probably best you disable those services.
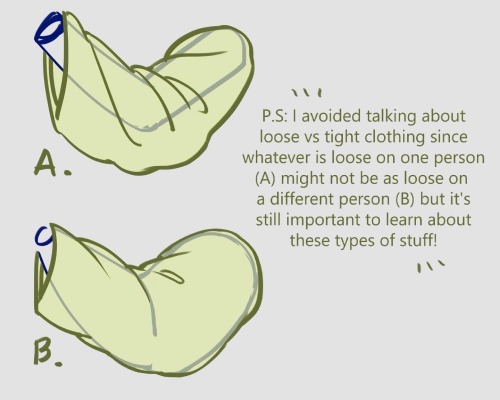
I forgot I have to be active here so here’s my Twitter tutorial on how to draw folds I made a while back to help a friend!


create your own home!
i found this great site that lets you create 3d models and floor plans of custom homes! you can even put in furniture and customize wallpapers/floors!! it has everything you could ask for!! you can use it make ref pictures of your oc homes or just make your dream house!
this is what i manged to make


-
 mothymyths liked this · 4 weeks ago
 -
 plasticrarity liked this · 1 month ago
 -
 arttutsifind reblogged this · 1 month ago
 -
 zmbiecoffin liked this · 1 month ago
 -
 xsolar-ghost reblogged this · 1 month ago
 -
 khonsou-707 liked this · 2 months ago
 -
 anne0png liked this · 2 months ago
 -
 saigar-art liked this · 2 months ago
 -
 mickeysartrefs reblogged this · 3 months ago
 -
 atena-md liked this · 3 months ago
 -
 koteeque liked this · 3 months ago
 -
 randomreblogsofartstuff reblogged this · 3 months ago
 -
 pliumorsmth reblogged this · 4 months ago
 -
pliumorsmth liked this · 4 months ago
-
 tamdam41 reblogged this · 4 months ago
 -
 autisticdrizzt liked this · 4 months ago
 -
 roseybloodlust reblogged this · 4 months ago
 -
 nefarious-virgo reblogged this · 6 months ago
 -
 talyawnchstr liked this · 6 months ago
 -
 sashatheejade liked this · 6 months ago
 -
 multidimensionalfang1rl liked this · 6 months ago
 -
 hannashiro reblogged this · 6 months ago
 -
 alchoholic liked this · 7 months ago
 -
 doublxpresso liked this · 7 months ago
 -
 saint-hart reblogged this · 7 months ago
 -
 artrefforsteph reblogged this · 8 months ago
 -
 houhwhosaidthat reblogged this · 8 months ago
 -
houhwhosaidthat reblogged this · 8 months ago
-
 lee-is-trans reblogged this · 8 months ago
 -
 redcotai reblogged this · 8 months ago
 -
 byebyeshow liked this · 9 months ago
 -
 arthalo reblogged this · 9 months ago
 -
 artking-4 reblogged this · 9 months ago
 -
 sinnerbird liked this · 9 months ago
 -
lanakatte reblogged this · 9 months ago
-
lanakatte liked this · 9 months ago
-
 imtoffe liked this · 10 months ago
 -
 rainstorm-world liked this · 10 months ago
 -
 umbermomo liked this · 10 months ago
 -
 juniperize liked this · 10 months ago
 -
 carrion149 reblogged this · 10 months ago
 -
 afabulousjello reblogged this · 10 months ago
 -
 crestfallenclown liked this · 11 months ago
 -
 loyo liked this · 11 months ago
 -
 m00g4n reblogged this · 11 months ago
 -
m00g4n liked this · 11 months ago
NSFW because there will probably be nude refs | this is a side blog to sort all of the art stuff I need | none of it is mine
151 posts