Shading Colour Tips
shading colour tips
hey yall its me the Art Mom™ to help you shade pretty
rule 1: DO NOT SHADE WITH BLACK. EVER. IT NEVER LOOKS GOOD.
red- shade with a slightly darker shade of purple
orange- slightly darker and more saturated shade of red
yellow- i think like..a peach could work but make it a really light peach
green- shade with darker and less saturated shade of blue or teal
blue- shade with purple
purple- a shade thats darker than the purple you’re using and maybe a little pink (MAYBE blue)
pink- darker shade of red
white- a really light lavender or blue..or i guess any really light colour??
black- okay listen dont use pure black to colour anything unless you want to leave it with flat colours because you cant really shade black lol
grey- a slightly darker shade of purple or blue (less saturated)
brown- slightly darker and less saturated shade of purple or red
aaaaand thats all i got lol. let me know if there is anything i should add to this list!!
More Posts from Artrefforsteph and Others


Tumblr Dashboard Image Display Sizes (Updated March 20, 2016):
Photo Post: 540 by 810 pixels for dashboard view. Use 1280 by 1920 pixels for high-res version (except for superwide panoramas).
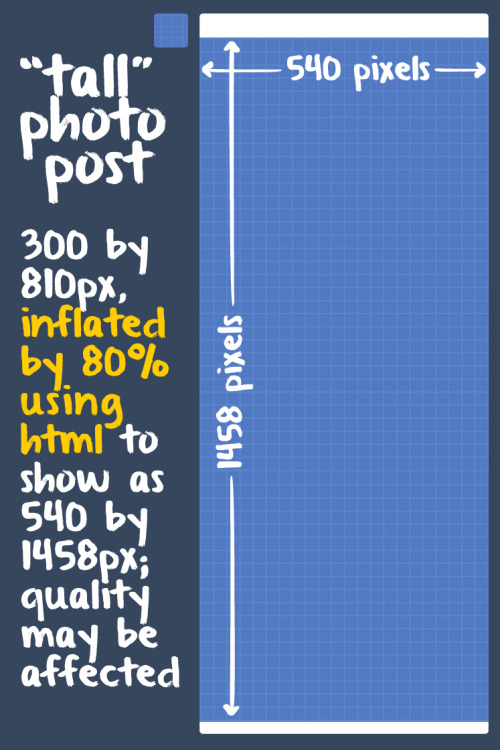
“Tall” Photo Post: Tumblr takes a 300-by-810-pixel version of your image then stretches it by 80% using HTML height and width attributes to make it 540 by 1458 pixels. Image quality may be diminished. Aim for uploading at least 710-by-1920-pixel images in case Tumblr switches to a better image size on the Dashboard. (It’s happened before.)
Photoset: 540-pixel width for one image in a photoset row. 268-pixel width for two images in a photoset row. For three images in a photoset row, Tumblr displays 177 pixels on the left and right images and 178 pixels for the middle. Gutters are 4 pixels.
Audio Post: 169 by 169 pixels for album art.
Link Post: 540 pixels wide for the image grabbed by Tumblr from the web link (if available).
Text Post: As of March 30, 2015, inline images can appear full-width (540 pixels wide). Any inline images that are 300 pixels wide or larger will display as full-width.
Avatar: 64-by-64-pixel icon next to posts.


Why Krita is Awesome: A Collection of Reasons Why This Program is Worth Taking a Look At
Krita is a painting program that has been around for a while, and in the last few years, underwent major changes and improvements. Because of these improvements, many artists are using it not just because it is free, but because it offers amazing features. These are by no means all of the great things Krita has to offer, but simply some of my favorite features of the program.

1. The Brush Engines.
Yes, engines. As in plural. There are many. And they all do different things. There is no way you could possibly capture all of its possibilities with one screen shot, but here are just some of the possibilities. Along side standard round, square, and shape, and textured brushes, there are brushes that smear, blend, and create interesting abstract strokes. There are brushes for filters, and one of my favorites, the Experiment Brush, which is basically a pre-filled lasso tool.
Brushes also support weighted smoothing, or brush stabilizers.

This is incredibly useful for line art. And while I do not usually use this feature, it is something that I feel many programs are lacking, such as Photoshop.
But its brushes aren’t the only thing about Krita with variety.

2. Color Selector Customization.
Whether you prefer something basic, or something more complicated, Krita will likely have what youre looking for. You are not likely to find yourself missing your other program’s color wheels. There are even more options than this, and other color selectors.

Gotta love that customization.
Krita also has some great naviation tools.

3. On the fly rotation, zoom, and brush sizing.
With krita, zooming, rotating, and brush size scaling are all smooth, and dynamic with the use of hot keys. These are features I miss when in other programs. To zoom, Ctrl+Middle mouse button, hover over the screen to zoom in and out. The same with shift rotates (press the ‘5’ key to reset rotation). Holding down shift and draging your brush on the canvas dynamically changes its size, allowing you to see the change, and get the exact size you want without brackets. Brackets also work, if that’s what you are used to. Krita also has highly customizable hot keys.

4. The Pop Up Pallet
The pop up pallet is a set of your 10 favorite brushes (which you can edit), and a built in color wheel that appears when you right click on the canvas. It is incredibly useful for switching between those few brushes that you use in almost every picture.

5. Real time, seamless tiles creation.
Pressing the W key in Krita will infinitely tile your canvas, and allow you to work real time on simple to complex tiled images. You can zoom in and out to see how your tiles work form a distance, and paint freely to create seamless artwork easily, without having to check using filters and manually tiling. Very usefull for patterns, backgrounds, and games.

6. The Symmetry Tool
This one goes without saying, Krita supports both horizontal and vertical symmetry, along with a brush that is capable of radial symmtry with as many directions as you like.

Go nuts, kid.
There are many more reasons why this program is awesome. And it is only going to get more awesome. And the coolest thing about it, is that it is 100% free. So go check it out! There’s nothing to lose. Krita isn’t for everyone, it can be hard to get the hang of, and it is not meant for photo editing, it is a program completely focused on digital painting from start to finish.
Give it a go and see if Krita is the program for you.
WACOM TABLET DRIVER NOT FOUND - What Do
So, you put your Windows computer to sleep for the night. You come back the next day all eager to wake it up and put it right to work on that thing you’ve been working on and ….
Oh no - you’ve seemed to have lost all pressure sensitivity and high resolution pen tracking! Well, you figure, why not go check the driver settings. Maybe it’s just groggy and needs a little morning reminder? You go to your Control Panel, click on Wacom Properties Configu—
Ah.
Now, you figure, all is lost and there’s only one thing left to do: save your work, close all your programs, and do a full system restart. What a fun time this is.
But HOLD ON! There’s another way! Try this out first before pulling the plug:
Open your Start menu (or press the Windows Key) and simply type “Services”. There will be an icon at the top of your list which appears to be two small gears with the name “Services.” Click that and look what happens next:
Scroll down the list and select “Wacom Professional Tablet Service” from the list of services and click the little “Restart” link in the column to the left. Now simply wait for the service to stop and start itself back up again!
If for some reason, clicking this little “Restart” button makes matters WORSE, the failsafe approach is the manual restart. Double click the “Wacom Professional Tablet” service and a window will pop up.
Manually stop the Wacom driver by clicking the Stop button. Wait for it to shut down, then start it back up again with the Start button once it becomes visible. Once restarted, click OK!
Test your Tablet now in Photoshop. You may have your pressure sensitivity fully restored!
IF NOT, simply close and reopen Photoshop, which will be nice and quick since it (and your work) are still loaded into recent memory. Yes, this isn’t IDEAL, but it surely beats having to close EVERYTHING and restart the whole computer. Especially if you were listening to a good tune at the time.
Now, providing you’ve done it correctly, (really now, how could you not,) you should find your Wacom’s pressure and tracking sensitivity fully restored! AND you’ll have access to the Tablet Properties config app once again!
Celebrations! For discovering such a wonderful little time saver.
:: ADDENDUM ::
As pointed out by Addleton there is a permanent fix for this issue by disabling the service called “TabletServicePen” if you’re using an Intuos/Bamboo or “Tablet PC Input Service” if you’re using a Cintiq.
Disabling this will stop this issue for good – but it will disable all Windows-related tablet functions such as flicks and handwriting, and may make some software such as SAI misbehave on certain hardware. If all you use your tablet for is Photoshop and drawing, it’s probably best you disable those services.


i hope this is readable omg
yea take this with a grain of salt because granted half the time i have no idea what im doing and yea
step by step explanation of this


Setting Forward - Submitted by Lost-in-thoughts-all-alone
#0C0524 #16196A #22238D #3C3EE1 #3B64FA
apparently ppl don’t know about waifu2x??? despite its… concerning name it’s literally the most convenient website i’ve ever come across as an artist
it allows you to resize artwork without it becoming pixellated. this is a MASSIVE help if you, for example, make lineart too small or something. it works best with things that 1. have no textures 2. have smooth lines 3. have cel shading, but it still works really damn well for things that don’t fit that profile
here’s an example:

normal size

2x in paint

2x in waifu2x
so like, there’s that. go wild

Please, like or reblog if you download it
Cecilia Script - Hello stockholm - Livewell - Pirmokas - Chunkfive ex - Solmet brush
-
 penthepoet reblogged this · 1 week ago
 -
penthepoet liked this · 1 week ago
-
 renicrusecal liked this · 1 week ago
 -
 yceptomniversstudios reblogged this · 1 week ago
 -
 b-drawssometimes reblogged this · 1 week ago
 -
 friendly-neighborhood-chicken liked this · 2 weeks ago
 -
 narendur liked this · 2 weeks ago
 -
 butabitconfused reblogged this · 2 weeks ago
 -
 pastellepastary liked this · 2 weeks ago
 -
 crownlandssun liked this · 2 weeks ago
 -
 mannequia reblogged this · 2 weeks ago
 -
mannequia liked this · 2 weeks ago
-
 mortellanarts liked this · 2 weeks ago
 -
 melonisopod reblogged this · 2 weeks ago
 -
 sk8-strawberrymilkshake liked this · 2 weeks ago
 -
 red-h0t-f1re liked this · 2 weeks ago
 -
 artking-4 reblogged this · 2 weeks ago
 -
 sophi-coby-art liked this · 2 weeks ago
 -
 puer-natus-ab-astris liked this · 2 weeks ago
 -
 starlantern reblogged this · 2 weeks ago
 -
 thetravelershub liked this · 2 weeks ago
 -
 slayers-sd liked this · 2 weeks ago
 -
 remnantmachine liked this · 2 weeks ago
 -
 the--pony-box reblogged this · 2 weeks ago
 -
 marsinsane liked this · 2 weeks ago
 -
 calypsotea liked this · 2 weeks ago
 -
 vore-goblin reblogged this · 2 weeks ago
 -
 coolio1738 reblogged this · 3 weeks ago
 -
coolio1738 liked this · 3 weeks ago
-
 coolcakebaker35 reblogged this · 3 weeks ago
 -
 selfportrait27 liked this · 3 weeks ago
 -
 cafferefs reblogged this · 3 weeks ago
 -
 cloudcandyala liked this · 3 weeks ago
 -
 person-who-likes-stuff liked this · 3 weeks ago
 -
 thereaderinsertlady liked this · 3 weeks ago
 -
 acro111 reblogged this · 3 weeks ago
 -
 buzzyandbadatmath liked this · 4 weeks ago
 -
 trypano reblogged this · 4 weeks ago
 -
 sassyke--uchiha liked this · 4 weeks ago
 -
 jstar-11 reblogged this · 4 weeks ago
 -
jstar-11 liked this · 4 weeks ago
-
 the-unknown-wanderer liked this · 1 month ago
 -
 lunas-pit liked this · 1 month ago
 -
 soybeansystem reblogged this · 1 month ago
 -
 soundofcomets reblogged this · 1 month ago
NSFW because there will probably be nude refs | this is a side blog to sort all of the art stuff I need | none of it is mine
151 posts