Experience Tumblr like never before
Cooking - Blog Posts


PIZZA TOAST
From: Honkai Impact 3

@bravotv - I’m finally participating. . . . . . . . . . . . #16bathrooms #bravotv #bravotvaddict #bravotvmemes #bravotvjunkie #bravotvnews #cooking #cookingblog #cookingmemes #pettymemes #dailymemes #funnymemes #anxietyrelief #mentalhealthawareness #rhop #rhod #rhoslc #rhony #rhonj #rhoa #rhoc #rhobh #shahsofsunset #belowdeckmed #bravotv #bravotvmemes https://www.instagram.com/p/CTH5dMwrsNq/?utm_medium=tumblr
This is a big, giant list of Youtube tutorials that will teach you all the basic life skills you need to know in order to be a functional adult. There are a lot of important skills that aren’t included in this list, but this should be enough of a basic guide to get you started and prevent you from making a total mess of yourself. Happy adulting! Household Skills:
How to unclog a toilet without a plunger
How to fix a blown fuse
How to fix a leaky faucet
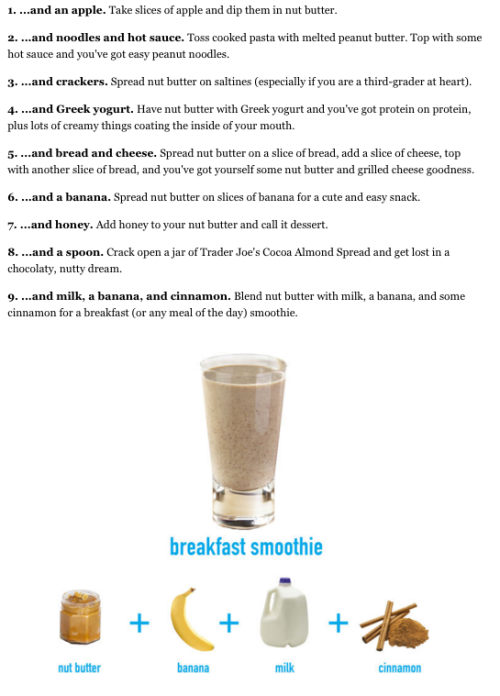
How to clean soap scum from your tub and shower
How to escape from a house fire
How to make a budget and stick to it
How to sharpen a knife
How to clean a self-cleaning oven
How to clean red wine stains from carpet
How to clean blood stains from fabric
How to clean grease stains from fabric
How to do a load of laundry
How to iron your clothes
How to test your smoke detectors
Cooking Skills:
How to tell if produce is ripe
How to know if food is expired
How to properly sanitize a kitchen
How to cook an egg
How to make rice
How to make pasta
How to put out a kitchen grease fire safely
How to use a gas stove
How to use a convection oven
How to cook meat safely
How to use a stand mixer
How to use kitchen knives properly
How to make mashed potatoes
How to make grilled cheese sandwiches
Health Skills:
How to stop bleeding
How to treat a burn
How to do CPR (on an adult)
How to do CPR (on a child)
How to do CPR (on a baby)
How to help someone who is choking
How to save yourself if you are choking alone
How to read a nutrition label
How to treat frostbite
How to recognize when someone is having a stroke
How to maintain a healthy sleep schedule
Mental Health Skills:
How to calm down during a panic attack
How to help someone who is suicidal
How to meditate
How to stop self-harming
How to recognize problem drinking
How to choose a therapist
How to deal with disappointment
How to cope with grief
How to raise your self-esteem
Relationship and Social Skills:
How to apologize
How to cope with a breakup
How to accept criticism
How to deal with bullying
How to argue in a healthy way
How to ask someone out
How to break up with someone
How to recognize an abusive relationship
How to rekindle a damaged friendship
How to speak in public
Job Hunting Skills:
How to tie a tie
How to write a resume
How to write a cover letter
How to dress for a job interview (for women/femmes)
How to dress for a job interview (for men/masculines)
How to properly shake hands
How to nail a job interview
Other Skills:
How to sew on a button
How to hammer a nail
How to change your oil
How to put gas in your car
How to jump-start a car
How to pick a good password
How to back up your files
How to write a cheque
애니먹방 5분모음 - Delicious Anime Food Compilation Part 18
A family member of mine had surgery recently and hearing that them and their partner have been feeling a little Not Great trying to keep up with everything, I went into my stash of meats and veggies I've been building up in my freezer for a while to make them a bunch of meals so they could have one less task on their plate :3
I managed to make a total of 20 meals for them, 4 plates of 5 different kinds (Stir fry as well, but not pictured here as they picked that one up yesterday before I was done cooking everything) and a lemon cake for dessert!
Took me 15 hours cause I'm a slow cook, But I'm really really proud :D


*Opening a package of Italian Meatballs for some spaghetti I'm making*
Huh.. I wonder what kind of meatballs are traditionally put into pasta dishes
*realizes*
Guys, I was out of milk so I experimented with adding chocolate müllermilch to my coffee and it’s literally so delicious. Like a coffee taste chocolate but without the overbearing sweetness. 10/10 will do again🌸


DAY SIX Emmet appreciation month (June 2024)
[cooking]
Emmet and Ingo both know how to cook most basic things, but they don´t tend to do it a lot. A busy scedule lends to efficiency, so most of what they eat is store-bought or leftovers.
Their tastes in food differ more often than not; One thing they can agree on though, is garlic bread. So, sometimes when they´re not too busy and feel like indulging, it´s garlic time! (too bad they get a bit too excited sometimes, a burnt tounge is never nice to have)
Do any of u have decent recipes that are like 5 ingredients (not including spices) and take 45 mins or less to prepare i gotta stop eating sandwiches for dinner


I made Okonomiyaki tonight! I made it with corn, Kimchi, tuna, and american cabbage (the store was out of nappa). What do you think?!

Delzoun "Tide-Me-Overs"

“While these are customary consumables at Hornmoot, the traditional human-dwarven trading festival that marks the dawn of Spring, there isn’t a holiday on the eventful dwarven calendar that doesn’t feature these scrumptious meats on the menu.” - Heroes’ Feast, p. 90
Personally, you’d be hard-pressed to find a more dwarven food than the good old-fashioned meatball.
Heroes’ Feast’s Delzoun “Tide-Me-Overs” bring dwarven kitchens to life with these extremely tasty and juicy meatballs! Leagues better than anything you’d buy at the grocery store, I would absolutely suggest making these yourself.
This recipe is also ridiculously forgiving. Once, I doubled nearly all the ingredients by accident, aside from the meat, and they still came out amazing!
If you don’t eat pork, no worries! They’re just as tasty using only beef!
Check out below for tips and tricks when making this yourself! Get Heroes’ Feast here: https://dnd.wizards.com/heroes-feast
Prep: 15 mins Cook: 1h 30 mins Total: 1h 45 mins

Ingredients:
¼ cup (60 ml) heavy cream*
1 egg
2 slices dark bread (such as rye), crusts discharged, remainder torn into pieces**
3 tbsp. (43 g) unsalted butter
1 small onion, finely chopped
Kosher salt
¼ tsp. (2 g) ground allspice
8 oz (225 g) ground pork
8 oz (225 g) lean ground beef
Freshly ground black pepper
2 tbsp. (8 g) all-purpose flour
1 ½ cups (350 ml) low-sodium chicken broth
1 tsp. (4 g) light brown sugar
1 ½ tsp. (7 ml) soy sauce
½ tsp. (2 ml) fresh lemon juice
3 tbsp. (12 g) finely chopped fresh dill or parsley
* I’ve used both heavy cream and half-and-half with no issues.
** I used Vienna-style Pumpernickel Bread, cut into standard ½ -inch sandwich slices at the thickest part of the loaf.

In a large bowl, whisk together the cream and egg (top-left).
Add the bread, mix well, and set aside, stirring occasionally, until the bread is softened, about 20 minutes (top-right).
Using a fork or sturdy spoon, mash the bread into a paste and set aside (bottom).
NOTE: Apparently, the bread is not what binds the meat/other ingredients together, but works with the milk to give the meatballs moisture and texture! The eggs are the only binding ingredient.
In hindsight, this makes sense, since in baking eggs are a binder…

Meanwhile, in a skillet over medium heat, melt 1 tbsp. (14 g) of the butter. Add the onion and ½ tsp. (3 g) salt and cook, stirring, until softened, about 4 minutes (left).
Add the allspice and cook, stirring, until fragrant, about 40 seconds (right).
Remove from heat and let them cool to room temperature. Laying mine in a single layer in the skillet, it took about 10 minutes.
TIP: Don’t be afraid to eat some of the onions to see if they’ve softened enough.
TIP: Cooling my onions in a single layer in the skillet took about 10 minutes.

Preheat the oven to 475℉ (245℃) with a wire rack in the middle of the oven. Coat a large wire rack with nonstick cooking spray and set it in a large, rimmed baking sheet.
Add the cooled onion mixture, pork, ground beef, baking powder, 1 tsp. (5 g) salt and ½ tsp. (1 g) pepper to the bread paste and, using a large spoon or your hands, mix until well combined and uniform.
TIP: To save yourself time when doing the dishes, line the baking sheet with aluminum foil so you don’t need to scrape any burned bits off.
NOTE: Personally, I didn’t run into this problem while making mine, but it’s important to only mix the meat mixture until everything is just combined. Overmixing will result in stiffer, tougher meatballs.

With moistened hands, form the mixture into generous 1-tablespoon-sized balls (left).
Arrange the meatballs on the rack in the baking sheet and bake until lightly browned, about 20 minutes, rotating the pan halfway through (right).
NOTE: I had to make double the amount of pork/beef meatballs since 8 oz packages of each ground meat were not available. Expect about half the amount of meatballs that you see here if making this yourself.
NOTE: The meatballs will sag through the wire rack a little bit when placed, this is fine!
NOTE: The ones shown above are the size Heroes’ Feast recommends. I wanted them to be a little bit larger the second time I made them, so I went for golf-ball sized. The cooking time stayed the same, but I found the weight of them might have been a bit too much and they lost way more structure than the smaller ones.
However, that was also the time I accidentally doubled all the ingredients aside from the meat, so I’m sure there was more at play there. Just something to keep in mind. They still came out great though! In fact, they’re the ones shown in the final picture.

Wipe out the skillet used for the onions to remove any stray onion bits, set it over medium heat, and melt the remaining 2 tbsp. (28 g) butter. Stirring constantly, cook until fragrant and a shade darker, 1 to 2 minutes.
Add flour and cook, stirring constantly, until golden, 2 to 3 minutes (top-left).
Switch to a whisk and, whisking constantly, gradually add the broth. Continuing to whisk often, cook for about 2 minutes (top-right).
Add the brown sugar, soy sauce, lemon juice, and ¼ tsp. (0.5 g) pepper and continue to whisk and cook until thickened, about 2 more minutes (bottom).
NOTE: The Heroes’ Feast “cook’s notes” mentions that the sauce will thicken quickly as it cools, and to add extra chicken broth to loosen the consistency.
They’re absolutely right! It’s more obvious in the next pictures but the sauce thickens a lot. It’s also a lot darker than what’s shown in the preview image in the book, so I’m not sure how much extra broth they had to add, but it seems like quite a bit.

Add meatballs to the sauce and simmer, stirring occasionally, until heated through, about 4 minutes (left).
Stir in most of the dill or parsley and taste and adjust the seasoning with additional salt and pepper, if necessary (right).
Transfer to a serving dish, sprinkle with remaining dill or parsley, and serve hot.

Overall, I would give this recipe a 5/5. It was a little daunting since the ingredients list was so long, but once I got started making the meatballs it was actually remarkably simple! They’re really juicy, have great texture, and the allspice-seasoned onions are so tasty!
The sauce is a little awkward to make, but it does add amazing flavour. But, again, the meatballs retained so much moisture you don’t really need a sauce to enjoy them!
Honestly, if you have the time and are sick of store-bought meatballs, definitely give these a try.
Finally, as I mentioned earlier, you can totally make these with only beef (shown in the final picture above)! They’ll still retain quite a bit of moisture and be super delicious.
Stuffed Egg-Battered Toast

“There’s nothing more comforting to a comfort-obsessed halfling than the warm intermingling scents of vanilla, maple, and walnuts filling their home.” - Heroes’ Feast, p. 120
French toast is a staple of Sunday Brunches everywhere, and it’s easy to see why. This fried breakfast bread is easily customized with whatever you want. Syrup? Eggs? Fruit? It’s all fair game to this tasty toast!
Taking a swing at its own version, Heroes’ Feast’s Stuffed Egg-Battered Toast looks to change it up by putting its toppings inside, rather than on top.
With each slice stuffed with mascarpone, walnuts, and a truly questionable amount of vanilla extract, your kitchen and taste buds are surely going to be treated to that homely vanilla smell that halflings crave so much.
Check out below for my notes on the results and for tips and tricks when making this yourself! Get Heroes’ Feast here: https://dnd.wizards.com/heroes-feast
Prep: 5 mins Cook: 25 mins Total: 30 mins

Ingredients:
4 ounces (½ cup, 120 g) mascarpone, at room temperature
¼ cup (25 g) walnuts, finely chopped
2 tsp. (10 ml) pure vanilla extract*
4 (1-inch-thick) slices of brioche or challah
2 eggs
½ cup (120 ml) whole milk
¼ tsp. (2 g) kosher salt
2 tbsp. (30 g) unsalted butter
½ cup (120 ml) maple syrup
Confectioners’ sugar for dusting**
* That uh… sure is an amount of vanilla for a ½ cup of mascarpone.
** I used chopped strawberries instead.

In a small bowl, stir together the mascarpone, walnuts and vanilla. (I forgot to take a picture of this each time I made it. L.)
Use a thin knife to cut a 2-inch-long slit through the side of each slice of brioche, creating a pocket.
Gently open the pocket and spoon 1 tbsp. of the mascarpone mixture into each slice.
TIP: As mentioned in the “cook’s notes” section, the bread is very delicate and tears easily- so take extra caution when opening and stuffing the pockets.
Alternatively, the notes mention that you could use ½-inch slices and spread the mixture between them like a sandwich. However, I worry about its structural integrity while dipping it in the egg mixture or flipping it in the frying pan.
But, since stuffing each slice is a pain, it might be worth going with the sandwich method.
NOTE: Only stuff the slices if they’re cut 1-inch-thick. ½-inch and even ¾-inch slices are way too thin and will tear.

In a pie dish or shallow bowl, whisk together the eggs, milk, and salt.

BEFORE DIPPING the slices, melt 1 tbsp. butter in a large skillet over medium heat.
Dip two stuffed slices into the egg mixture, turning to soak both sides and letting any excess batter drip back into the bowl.
TIP: You only need to let each side soak for a few seconds. Any longer than 5 makes the bread mushy.

Place the sides in a skillet and cook for 2-3 minutes per side, until golden brown. Use a spatula to transfer the toasts to a warm plate.
Repeat to cook the remaining two stuffed slices.
Meanwhile, warm the maple syrup in a small saucepan over low heat for a few minutes.
TIP: The “cook’s notes” section mentions that warmed marmalade can be used to replace the maple syrup.
NOTE: I misread the instructions for this step and cooked all four slices at once. To fix the uneven browning, I flipped the lighter parts to the middle of the pan for about 20 seconds after cooking each side.
NOTE: To save on dishes, I chose to not warm my syrup.

Top the toast with strawberries (and/or confectioners’ sugar), drizzle with the maple syrup, and serve.
Overall, this recipe has one thing really working against it: the vanilla extract.
Personally, I found the filling to be inedible with 2 tsp. of vanilla extract in the mascarpone mixture. The alcohol in the extract doesn’t have enough time to cook out and leaves everything with a distinctly alcoholic taste.
This would be fine if other flavours used in the recipe complimented the taste of the alcohol or if the taste was expected (like an alcoholic french toast). Unfortunately, nothing here works with it and, being a breakfast food, it isn’t expected. So, it ends up overwhelming the toast and making it unappetizing.
My solution to this was to cut back the vanilla extract to ½ tsp. The taste was still a little strong, but there was an improvement. If you’re planning to make this at home, consider cutting the vanilla back even further, or try using vanilla bean instead to skip the alcohol entirely.
It’s also worth mentioning that the mascarpone makes these very rich. Interestingly, I found that the syrup and strawberries really helped cut the richness. You’re still only going to eat one though.
Finally, as mentioned in a previous step, although the structural integrity might be questionable with the sandwich method, it might be worth it just to skip spooning the mixture into the pockets. The mess it creates really makes you wonder if it’s worth it.
All in all, the unaltered recipe gets a 2.5/5, going up to 4/5 when the amount of vanilla extract is reduced. Still losing points for the remaining alcoholic taste and messy and needlessly difficult construction.
hey i was caramelizing your boyfriend and he uh. he stuck to the pan. yeah i didn’t deglaze it enough and he’s really burnt on there. i mean we can soak him for a while and see if we can scrape him up but i’m not optimistic. sorry.
One Pot Meal

A zero-effort dinner with great flavour and fast cook time.
Simple and nutritious meals are an important thing to have in your back pocket, especially as a student. In a previous post, I shared The Ultimate Sausage Pasta, a quick and easy recipe from my housemate’s friend.
This time, we’re looking at the One Pot Meal, one of my favourite zero-effort dinners to make when I just really don’t feel like cooking. Minimal ingredients (two of which can sit in your cupboard until you need them) and an under half-hour cook time make this the perfect meal for when you’re tired or need a break from the kitchen.
As an added bonus, the Italian sausage adds great flavour on its own, so you don’t need to worry about whether you have the right spices or not!
Check out below for the recipe!
Prep: 5 mins Cook: 20 mins Overall: 25 mins

Ingredients:
1 pack (500 g) mild Italian sausage*
2 tbsp. (30 g) unsalted butter
2 cans sliced potatoes
2 cans cut green beans
* I prefer Johnsonville brand.

First, slice the sausages into ½ inch (1 cm) pieces.

Next, melt the butter in a large wok or high-rimmed skillet with a lid on medium heat.
Add the sausage and cook until cooked through, about 10 mins, stirring frequently.
NOTE: If you’re using the sausage from frozen, you’ll need at least an extra 5 mins to the cooking time.

Drain the canned beans and potatoes, discarding the liquid. Add them to the wok or skillet and stir in with the sausage.
Turn the heat to low and cover with the lid. Let cook until the potatoes and beans have warmed up, about 8 mins, stirring occasionally.
Once everything is heated up, divide and serve!
Overall, I give this a 5/5. It’s simple, tasty, and low effort - truly a fantastic meal for after a long day.


Bruschetta Grilled Cheese

You're welcome.
Welcome to the only recipe for grilled cheese ever.
Don’t like tomatoes? Doesn’t matter. Get lost in the sauce of basil, garlic, balsamic vinegar, and cheese.
I don’t remember who thought of this first, me or my housemate, so I'm giving us shared credit for this invention. All I know is that we were hungry, had bruschetta mix left over from the night before, and are both apparently geniuses.
Now, enough talking, onto the recipe.
Prep time: 15 mins Cook time: 15 mins* Overall: 30 mins
* Can be longer based on if you want to marinate the mix or how many you want to make.

Ingredients:
1 dry pint (312 g) grape or cherry tomatoes, diced
4-5 fresh basil leaves, chopped
4-5 large cloves garlic, finely chopped
4 tbsp. (60 ml) balsamic vinegar*
Salt and pepper, to taste
Sourdough bread, sliced into sandwich slices**
Butter
Mozzarella or Swiss cheese slices
* Can vary based on how much dipping sauce you need.
** I used Vienna style sourdough bread for aesthetics but any style works for this as long as it's the thickness of a sandwich slice.

Add the diced tomato, basil, and garlic to a medium-sized mixing bowl (top-left).
Then, add the balsamic vinegar and salt and pepper to taste (top-right).
NOTE: You’ll want to add more balsamic vinegar depending on how many sandwiches you’re making so that everyone has dipping sauce!

Mix everything together until all of the tomatoes have been coated in balsamic vinegar.
NOTE: You can totally eat this mix right away, but leaving it to marinate overnight gives extra depth to the flavour!

Heat a large, non-stick pan over medium heat. While it heats, butter two slices of the sourdough bread on one side.
Place one of the sourdough slices butter-side down in the pan once you can start to feel the heat radiating from the pan. Immediately add the cheese slices (top-left).
Add some of the bruschetta mixture on top of the cheese once you hear the butter start to sizzle (top-right). Make sure to leave as much liquid in the brushetta bowl as possible so it doesn’t make the bread too soggy!
NOTE: Definitely add the cheese before the mix. I’ve tried making this and adding the mix before the cheese and it just makes the bread soggy while you’re waiting for it to toast in the pan.

Add the top slice of bread butter-side out once you’ve added the bruschetta mix (top-left) and carefully flip the sandwich.
The structural integrity of these bad boys isn’t so great at this stage, so you’ll want to hold onto the top slice of bread until the last moment while you flip.
Repeat the flipping process until both sides are a nice golden brown (top-right).
TIP: To add some extra flavour to the bread, lightly drizzle both slices with some of the liquid from the bruschetta mix as they toast. Only do this once they’ve toasted for a bit on each side though or it’ll just make the bread soggy!

Now you’re ready to enjoy the best grilled cheese ever! Don’t forget the sauce!
As a side, I’ve found that carrots are a nice veggie snack to go with these since their sweetness compliments the sweetness from the tomatoes.
NOTE: I’ve found the bruschetta mix can be kept up to three days in a tupperware in the fridge before the flavour becomes just a little too overpowering.
"Orc" Bacon

“No, it isn’t made from orcs - but for orcs.” - Heroes’ Feast, p. 156
Until I found this recipe, I’d never thought of trying to dress up bacon. After all, bacon is bacon! However, “Orc” Bacon brings a tasty spin to this popular classic.
Coated with a savoury-sweet glaze and absolutely the easiest thing to make in Heroes’ Feast so far; this tasty treat is a great snack to prepare for a table of hungry adventurers or for yourself when life gets busy!
Try snacking on them with a side of the Yawning Portal Buttermilk Biscuits to really immerse yourself in that tavern vibe!
See below for my notes on the results and for some helpful tips and tricks when making this yourself! Get Heroes’ Feast here: https://dnd.wizards.com/heroes-feast
Prep: 1 min Cook: 30 mins* Total: ~30 mins
* Varies based on how crispy you like your bacon.

Ingredients (serves 4 as a snack):
1 lbs. (450 g) thick-cut bacon*
3 tbsp. (38 g) light-brown sugar
½ tsp. (1 g) freshly ground black pepper
1 tsp. (2 g) garlic powder
2 tbsp. (30 ml) orange juice
* I used regular cut bacon instead of thick-cut with no issues.

Start by preheating the oven to 375℉ (190℃) with a rack in the middle of the oven. Line a large rimmed baking sheet with foil. Coat a large wire rack with nonstick cooking spray and set it in the foil-lined pan.
Next, arrange the bacon slices on the rack, laying them tight against each other so the entire pound fits (top-left).
Roast the bacon strips until they render some of their fat and shrink a bit, about 12 minutes (top-right).
NOTE: I struggled to fit all of the regular cut bacon onto the rack even after cramming everything as tight as possible (rip those pieces at the top). This may be different for thick-cut but I ended up having three extra slices to spare.

While the bacon renders, in a small bowl, mix together the brown sugar, pepper, garlic, and orange juice.

Lightly brush the rendered slices with about half of the brown sugar mixture (top-left).
Continue roasting until the brown sugar adheres to the bacon and the bacon appears glossy, about 7 minutes (top-right).
Using tongs, turn over the pieces.

Lightly brush the slices with the remaining brown sugar mixture and continue roasting until the brown sugar mixture adheres to the bacon and looks glossy, 5 to 7 minutes.
Transfer slices to a serving plate and serve warm.
NOTE: For this last part, feel free to roast the slices for as long as it takes them to your preferred crispness level. The slices above roasted for about 11 minutes.

Overall, I would give this recipe a 5/5. I couldn't personally see myself eating these with eggs in the morning (clashing flavours) but it does make for a nice sweet and savoury snack!
Like I mentioned in the intro, the flavour and ease to throw it together make it a good choice to bring to a D&D session or make as a nerdy snack for yourself when you’re busy, no matter what level your cooking skill is at.
Watch out though! They’re super sticky so make sure to have plenty of napkins on hand.
Traveler's Stew

“This earthy, slow-cooked concoction consisting of beef (or rothé), carrots, potatoes, and onions in a dark beef-infused broth is served in eating establishments everywhere, from the Green Dragon Inn and the Yawning Portal to Ellfate’s Eatery and the Inn of the Last Home.” - Heroes’ Feast, p. 7
The first recipe in Heroes' Feast and certainly deserving of it! Traveler’s Stew makes for a hearty lunch or dinner capable of being customised based on which stout or dark beer you chose.
I’ve tried it with a couple different beers now and so far the almost chocolaty Cowbell Brewing Co. Draught Nitro Stout has been my favourite. Its flavour adds extra depth and richness to the broth without altering how you’d expect a stew to taste too much. Experiment on your own to get the flavour you like best!
The biggest difference between this stew and most that I've had in the past is the broth is much more watery. Personally, I liked the change, but if you prefer a thicker consistency, mash up a couple of the cooked potato chunks and stir them in - the starch will thicken it up.
See below for my notes on the results and for some helpful tips and tricks when making this yourself! Get Heroes’ Feast here: https://dnd.wizards.com/heroes-feast
Prep: 10 mins* Cook: 2h 50 mins Total: 3 hours
* Cut down on prep time by chopping up the vegetables while the beef simmers.

Ingredients:
¼ cup (~30 g) all-purpose flour
Kosher salt and freshly ground black pepper
1 ½ lbs. (1.35 kg) beef stew meat, cut into 1-inch (~2.5 cm) pieces
1 tbsp. (15 ml) vegetable oil, plus more as needed*
1 cup (~240 ml) dark beer**
4 cups (~945 ml) low-sodium beef broth***
1 tsp. (2 g) sweet paprika
1 large yellow onion, chopped
2 carrots, peeled and cut into ½-inch (~1 cm) rounds
3 Yukon gold potatoes, peeled and cut into 1-inch (~2.5 cm) pieces
¼ cup (15 g) chopped fresh parsley
* I was out of vegetable oil and substituted extra virgin olive oil - no noticeable change in taste
** The dark beer pictured is not the chocolaty stout mentioned and recommended in the intro. The Waterloo Dark will add a licorice-like taste to the broth of your stew.
*** A carton of broth will be short on the amount needed by about ~¼ cup (45 ml). Use extra beer to make up the difference.

In a large bowl, combine the flour, 1 tsp. (6 g) salt, and several grinds of pepper. Add the beef and toss to coat well.

Warm the oil in a large, heavy pot over medium-high heat. Add one-third to half of the beef - do not crowd - and cook for about 5 minutes, turning to brown all sides evenly (top-left).
Transfer the browned beef to a plate and repeat to brown the remaining beef, adding more oil, if needed, between batches (top-right).

Pour the beer into the pot and use a wooden spoon to scrape up any browned bits.

Return browned beef to the pot and add the broth and paprika. Adjust the heat to low (or 1 on a 10 heat dial), cover, and cook at a simmer until the meat is very tender, 1 ½ to 2 hours.

Add the onion, carrots, and potatoes to the pot and continue to simmer until the vegetables are tender, about 30 minutes.

Stir in the parsley and season with salt and pepper. Serve hot.

Overall, I would give this recipe a 5/5. It was super easy to make, had great flavour, and the broth was a nice change-up from what I was used to.
Definitely do try out different beers to see which background flavour you like best!
Quith-Pa

“The most common variety of elven rations, this vegetarian trail food is made up primarily of dried fruits, but regional variations can include seeds, nuts, legumes, and beyond.” - Heroes’ Feast, p. 57
The best way to describe Quith-Pa from Heroes’ Feast is as a fruit truffle instead of a chocolate one. Packed with refreshing, fruity sweetness, toasty flavours, and no added sugar, it’s a great snack or dessert for those looking to try something new!
Additionally, they're small enough that you can easily pack them into a mini tupperware container and bring them with you for easy snacking on the go!
See below for my notes on the results and for some helpful tips and tricks when making this yourself! Get Heroes’ Feast here: https://dnd.wizards.com/heroes-feast
Prep: 10 mins Cook: 1h Total: 1h 10 mins

Ingredients (makes 12 ish):
1 orange
6 ounces (1 cup) (170 g) dried apricots, coarsely chopped
¾ cup (70 g) unsweetened shredded coconut, toasted*
¾ tsp. (4 ml) pure vanilla extract
Kosher salt
* To toast the coconut: spread out the coconut in an even layer in a large, flat-bottom pan on medium-low heat. Stir frequently until almost all of the coconut has reached a toasty golden brown colour, about 8-10 mins.

Using a microplane, grate the orange peel to yield 1 ½ tsp. (8 g, about half the rind of a large navel orange) of finely grated zest. Squeeze the orange to yield 1 ½ tbsp. (15 ml) of juice.

In a full-size or mini food processor, combine the apricots, ½ cup (25 g) of the toasted coconut, the orange zest and juice, vanilla, and a tiny pinch of salt.
Process until the mixture is very finely chopped, uniform, and cohesive, pulsing and stopping to scrape down the sides of the work as necessary.

Put the remaining ½ cup coconut in a wide, shallow bowl.
Roll scant 1-tablespoon (~18 g) portions of the apricot mixture into 1-inch balls, gently pressing as you roll to help them cohere (you should have 15 or 16 balls).
Working with three or four balls at a time, roll them in the remaining coconut, pressing them gently to help the coconut adhere.
Place the balls on a plate and rest them (to firm up and dry out slightly) for 45 minutes.
The balls will keep, stored in an airtight container at room temperature, for about 3 days.
TIP: They will be incredibly sticky while forming them. I recommend pressing the mixture together with your fingers to create the shape of a ball and then gently rolling them between your fingers (not your palms!) to finish shaping them.
You may need to brush off any mixture clinging to your hands a couple times while rolling it into a ball because the remaining stickiness from your hands will cause formed balls to break.
NOTE: If rolling them in a deeper, smaller bowl like I was, you may only be able to work with one or two at a time.

Overall, I would give this recipe a 4/5. Although the taste is great and they make a fantastic sweet snack for anyone trying to avoid added sugar, I feel like the effort/dishes to yield is a little low. Definitely at least double the recipe if you plan on making these yourself.
BONUS picture that didn’t make the cover photo:

Meal’s End

“[...] this refreshing dish is quick to concoct and easy to serve by the bowlful, requiring no baking. While there are subtle variations of “meal’s end” based on region and culture, the version with chopped persimmon or plum in lieu of field berries is quite seasonal and thus recommended.” - Heroes’ Feast, p. 79
Honestly, I'm going to start calling the whipped heavy cream, greek yogurt, vanilla extract combo that creates the base of Meal’s End “better whipped cream”. The rich sweetness of the cream and vanilla is both enhanced and offset by the addition of the greek yogurt in a way I still struggle to describe.
To make it even better, because the meringues melt quickly in your mouth, they add fantastic texture while not disturbing the overall smoothness of the dessert!
Rich without being heavy, Meal’s End from Heroes’ Feast is the perfect light dessert to have after any meal!
See below for my notes on the results and for some helpful tips and tricks when making this yourself! Get Heroes’ Feast here: https://dnd.wizards.com/heroes-feast
Prep: 10 mins Cook: 10 mins Total: 20 mins

Ingredients - serves 4 parfait glasses:
3 cups (430 g) fresh strawberries, rinsed and hulled (or a mix of berries)
Sugar as needed
1 ⅓ cups (315 ml) heavy cream
⅓ cup (80 ml) plain Greek yogurt (preferably whole milk) or crème fraîche*
¼ tsp. (1 ml) pure vanilla extract
2 ounces package (50 g/half the package shown) or homemade cocoa or vanilla meringues, coarsely crumbled (about 1 ⅓ cups)
* I used 2% plain Greek yogurt.

Coarsely chop 2 cups of the strawberries. In a bowl, mix the chopped strawberries with sugar to taste. (top-left bowl)
Slice or quarter the remaining 1 cup berries. In a small bowl, mix these strawberries with sugar to taste. (top-right bowl)

Using an electric or handheld whisk, beat the heavy whipping cream until it is softly whipped, adding 1 tbsp. of sugar once the cream has thickened.
This will take 1 to 1 ½ minutes with a stand mixer at high speed.
TIP: To make the cream whisk faster, put the bowl you are using in the fridge or freezer for 10 minutes until chilled. Also, keep the cream cold in the fridge until you’re ready to whip it.

Fold in the yogurt and vanilla just until blended.

Fold in the chopped berries and crumbled meringues.
Divide the mixture among four serving dishes, top with the sliced berries, and serve all at once.
NOTE: Time is not kind to the texture of the meringues. Serve Meal’s End immediately after making it. However, leftovers can be kept covered in the fridge and eaten later.

Overall, I would give this recipe a 5/5. Like I said in the intro, the meringues and berries compliment the smoothness and incredible flavour of the whipped cream mixture perfectly!
I would highly recommend eating this after a fish dinner, but it’s also a great dessert after heavier foods like steak.
Although eating it immediately after making will preserve the texture of the meringues, save any leftovers you’ve got from this! The flavour of the meringues will combine with the whipped cream and make a delicious dessert later too!
Elven Marruth

“Sometimes reductively referred to as “root pies” by dwarves and humans, marruth are incredibly hearty closed-faced canapés that are filled with spiced and herbed mashes of vegetables (carrots, potatoes, and carrots) and then lightly baked in a flaky, buttery crust.” - Heroes’ Feast, p. 64
Eating seasonal foods is a popular option because it helps local growers, tastes fresher, and makes you feel more connected to the season. Now, this is all well and good if you live in a climate with longer or all-year growing seasons; but what can you expect to be growing when you’re knee-deep in snow?
Believe it or not, there are winter seasonal vegetables! (rip fruit, you’ll be missed until spring)
Elven Marruth from Heroes’ Feast is a great use of hardy winter-season produce. The small pastries make for a great snack alongside a warm bowl of soup or, thanks to their nutritious filling, a great meal on their own!
These small pastries also hold a special place in my heart for being the first recipe I ever made from Heroes’ Feast (alongside Underdark Lotus with Fire Lichen Spread on p. 93)!
Check out below for my process in creating the house and for some helpful tips and tricks when making this yourself! Get Heroes’ Feast here: https://dnd.wizards.com/heroes-feast
Prep: 15 mins + pie crust, if making Cook: 2h 30 mins
Total: 2h 45 mins

Ingredients:
1 small yellow onion, finely chopped*
1 small Yukon gold potato, peeled and cut into ½-inch pieces
2 carrots, peeled and finely chopped*
2 cups (300 g) packed finely chopped green cabbage*
3 tbsp. (44 ml) extra-virgin olive oil
Kosher salt and freshly ground black pepper
2 tsp. (3 g) finely chopped fresh thyme, plus 1 ½ tbsp. (4 g) picked whole thyme leaves**
¾ tsp. (4 ml) soy sauce
¼ cup (4 g) chopped fresh dill
All-purpose flour for dusting
Pastry for 2 double-crust pies, thawed if frozen
1 egg
* To cut down on prep time, roughly chop the onion, carrot, and cabbage and then process them together in a food processor. You’ll need about 15 pulses get them all finely chopped.
** To pick the whole thyme leaves, pinch a stem of thyme and run your fingers down the opposite way the leaves are pointing.

First, preheat the oven to 375℉ (190℃) with the racks in the upper-middle and lower-middle of the oven. Line two large rimmed baking sheets with parchment paper or nonstick (silicone) liners.
Then, in a bowl, combine the onion, potato, carrots, cabbage, and olive oil and toss to coat the vegetables with the oil (top-left). Add ½ tsp. salt and a few grinds of pepper and toss to distribute (top-right).

Transfer the mixture to one of the prepared baking sheets, spreading it into a thin, even layer (set the bowl aside) (top-left).
Roast the vegetables on either rack until tender, 25 to 30 minutes, stirring and turning the vegetables two or three times (top-right).
NOTE: I misread the instructions so I spread the mixture over both sheets.

Remove the baking sheet from the oven, add the chopped thyme, and stir to incorporate it. Spread out the mixture and allow to cool to room temperature for about 20 minutes.
Leave the oven on for more baking and return the cooled veggies to the now-empty bowl. Stir in the soy sauce, dill, ¾ tsp. salt, and pepper to taste. Adjust the seasoning as necessary, and set aside until needed.
If making the filling ahead of time, turn off the oven, transfer the cooled mixture to a tupperware, and put it in the fridge until needed.

Replace the parchment paper on the baking sheet or wash the non-stick liner and return it to the baking sheet. Have a small bowl of water handy.
Dust a large piece of parchment paper or a clean work surface with flour. Working with one ball of homemade pastry at a time, or one sheet of store-bought pastry, roll the dough into a 12-inch (30 cm) circle (top-left).
Sprinkle half of the whole thyme leaves evenly over the pastry, cover with a piece of parchment paper, and roll lightly to help the thyme stick (top-right).

Flip the pastry over so the thyme leaves are on the bottom, and set aside. Repeat with the remaining pastry and remaining whole thyme leaves.
With a 4-inch (10 cm) round biscuit or cookie cutter, cut at least six circles out of each pastry round.
TIP: To keep the pastry as chilled as possible for maximum ~flakiness~ while baking, work with and cut out circles from one ball of pastry at a time. Place each cut circle on a plate covered with cling film and put in the fridge until needed.
Keep the scraps from the first dough ball in the fridge and combine with the scraps from the second dough ball. Roll out the combined scraps for extra circles.
NOTE: My pie crust recipe gives quite a bit of dough, so you’ll end up cutting out way more than the six asked for by Heroes’ Feast.

Working with as many of the pastry circles as you feel comfortable with to keep the dough chilled, place 1 ½ tbsp. (one slightly rounded tbsp.) of the vegetable mixture in the center of each round, leaving a ½-inch border around the edge.
Working with one piece of pastry at a time, moisten the edge of the pastry circle and fold over the pastry over the filling to make a half-moon shape. Press out any trapped air, press the edges firmly to seal, and crimp the edges using a fork to secure the seal.
Transfer the crimped pastries to a separate plate and keep in the fridge until ready to cook.
Repeat with the remaining pastry rounds and filling.

Once all of the pastries are ready, transfer them onto the prepared baking sheets.
In a small bowl, beat the egg with 1 tbsp. water and brush the tops and sides of each marruth with the mixture (top-left).
Bake until the marruths are light golden brown and crisp, about 25 minutes, rotating the sheets 180 degrees and switching racks halfway through baking (top-right).
Set the baking sheets on wire racks, cool the pastries for about 5 minutes, and serve hot.
NOTE: Despite the recipe only being supposed to make 12, I’ve always gotten somewhere between 18-22 marruths from the filling.
NOTE: You’ll notice the BIG marruth I’ve made on the tray. I was trying to see if I could make a larger version of this recipe since I’d made smaller ones of the Hand Pies (p. 21). However, the consensus was that the smaller ones were better. Expect 4-5 more marruths than shown if not making the big one.

Overall, I would give this recipe a 5/5. I’m usually not a huge fan of vegetable-based dishes, but these veggie turnovers are awesome. I’ve made them for weekend lunches and many a movie night and they’re always a massive hit!
The vegetables really work together with the soy sauce and herbs to create a great flavour with a texture reminiscent of a spring roll. If you’re looking for a more savoury turnover, this one’s for you.
MAKE SURE TO EAT THEM WARM though. It might just be me, but they don’t really work if they’re any colder than room temperature.
I would also recommend making the filling and pie crust on one day and assembling them the next day. It makes the cooking time a lot less daunting and not eat up your free time :)
P.S. You can make these for someone who doesn’t like onion by leaving it out. I’ve made them like this before and they said they were great!
2021 Tumblr Year In Review

For auld lang syne, my dear For auld lang syne We'll tak a cup o' kindness yet For auld lang syne
- Auld Lang Syne, Dougie MacLean
First year actively making content on the internet and it’s been a lot of fun so far! I’ve definitely learned a lot and would like to think I’ve improved since I started haha
According to Tumblr, my two most popular tags were #homecooking and #heroes’ feast!
As for posts, my top five are:
The Ultimate Sausage Pasta
Hand Pies (including small, snackable pies!) from Heroes’ Feast
Baked Feta Wrap
Hot Cocoa Broth from Heroes’ Feast
Soul Cakes and Halloween Costumes
The “slogan” I chose for 2022 is: Gaslight, Gatekeep, Girlboss
Holiday Wrap-Up 2021

“Can we eat the house yet?” - my dad waiting for me to take this picture
Just a quick index of all the holiday treats I made this December, both from Heroes’ Feast and my own kitchen!
Dec 5th - Cranberry-Banana Muffins!
Dec 5th - Earl Grey Cookies!
Dec 15th - Gingerbread from Heroes’ Feast! Check out the Showcase winners HERE
Dec 19th - Hot Cocoa Broth from Heroes’ Feast!
Hot Cocoa Broth

“Rumored to be the result when a Halfling mage cast wish to find the perfect fireside beverage, this salty, sweet, and spicy cocoa creation tickles every part of the soul.“ - Heroes’ Feast, p. 188
There’s nothing quite as special as a steaming cup of hot chocolate after an afternoon at the skating rink. Rich and warm - it’s the perfect drink to bring life back to freezing fingers and toes.
Full of chocolaty-deliciousness and a kick of cinnamon, the Hot Cocoa Broth from Heroes’ Feast is like having a Starbucks hot chocolate at home at a fraction of the cost (plus you don’t have to trudge through the snow to get it)!
If you’re looking for a snack to go with it, try out some Gingerbread cookies, Earl Grey cookies, or Cranberry-Banana muffins!
And don’t forget to VOTE in the unofficial 2021 Heroes’ Feast Gingerbread showcase! The winner will be announced on December 24th!
See below for my notes on the results and for some helpful tips and tricks when making this yourself! Get Heroes’ Feast here: https://dnd.wizards.com/heroes-feast
Prep: 5 mins Cook: 15 mins Overall: 20 mins

Ingredients*:
½ cup (50 g) unsweetened cocoa powder, preferably Dutch-processed
½ cup (50 g) packed light brown sugar, or to taste
¾ tsp. (2 g) ground cinnamon
½ tsp. (1 g) ground cardamom
pinch of kosher salt
1 cup (240 ml) water
2 ½ cups (600 ml) whole milk
1 tsp. (5 ml) pure vanilla extract
1 ½ cups (360 ml) espresso or very strong black coffee, hot**
* Makes enough for 4 servings.
** For strong coffee, use the same amount of coffee grounds and half the amount of water.

In a medium saucepan over medium heat, whisk together cocoa powder, brown sugar, cinnamon, cardamom, salt, and water until smooth.
Bring the mixture to a simmer and cook, stirring constantly, for about 2 minutes, making sure the whisk gets to the edges of the pan.

Whisk in the milk and bring to a simmer (do not boil), whisking frequently, about 10 minutes.
The goal here is to scald the milk - keeping the temperature between 180℉ (82℃) and 185℉ (85℃). I used an instant-read thermometer to keep an eye on the temp.
I kept the heat on medium until the thermometer read 180℉ (82℃) and then turned the heat down to medium-low to try to keep the temperature around there until 10 minutes had passed.
If you don’t have a thermometer, you can tell the milk has scalded when frothy bubbles form at the edges of the pan without whisking.

After scalding the milk, whisk in the espresso or strong coffee and vanilla. Taste and adjust the sweetness level with additional brown sugar, if needed. Divide evenly among 4 mugs.
If you want to add whipped cream on top, consider making your own!

Overall, I would give this recipe a 5/5. The base hot chocolate recipe is rich with dark chocolate and easy to adjust to make sweeter if needed. Also, the cardamom and cinnamon add a really awesome flavour - it really is like having your own specialty drink at home!
Heartlands Rose Apple and Blackberry Pie

“As the story goes, a hungry halfling returned from her hillside stroll with a heavy basket of crisp rose apples and plump blackberries. In typical indecisive halfling fashion, she couldn’t decide which to fill her pie with… so she chose both, and thus this legendary dessert was born.” - Heroes’ Feast, p. 139
As mentioned in a previous post, pie, the better version of cake, can take on many forms. With fall having wrapped up and given way to winter, it’s time to start scheduling Christmas parties and spending time with each other during the Holidays. So, why not dazzle partygoers by bringing in a slice (pun intended) of autumn with this apple and blackberry pie from Heroes’ Feast!
Although the original recipe is a little rough in construction, after some discussion for suggested changes, it holds together amazingly and makes sure that each bite, from the sweetness of the apples to the tartness of the blackberries, is worth the effort. This pie is also super great because it’s not overly sugary like most you’ll find at the store; using just enough while allowing the fruitiness of the filling to shine!
In this post, I’ll be breaking down the steps that were taken, for filling and crust, that help ensure that you end up with a stable pie instead of pie soup. In a rush? No worries, all changes are also summarized in the results section.
See below for my notes on the results and for some helpful tips and tricks when making this yourself! Get Heroes’ Feast here: https://dnd.wizards.com/heroes-feast
Prep: 15 mins* Cook: 5 hours** Overall: 5 hours 15 mins
* Can take longer if making your own crust.
** Can vary based on your experience making pie, this is the high-end estimate with plenty of leeway time. To save time on the day of, make the apples and pie crust a day ahead and store them in the fridge. If not possible, try to make the pie crust a day ahead and cook the apples while the crust chills in the fridge in the pie plate (see recipe steps).

Ingredients*:
⅔ cup + 1 tbsp. (155 g) sugar
½ tsp. (3 g) cinnamon
3 tbsp. + 2 tsp. (23 g + 5 g) cornstarch**
kosher salt
3 ½ pounds (1,575 g) [about 6] baking apples, peeled, quartered, cored, and cut lengthwise into ¼-inch slices***
Pastry for 2 double-crust pies
12 ounces (340 g) blackberries, rinsed
1 tbsp. (5 ml) fresh lemon juice
1 ½ tbsp. (21 g) unsalted butter, cut into pieces
1 egg
Lightly sweetened whipped cream for serving (optional)
* Makes one 9-inch deep-dish pie. Here’s the pie dish I use.
** Because there’s a lot of liquid in the filling, I took A Finnicky Guide’s suggestion and added a little more cornstarch. I split the extra 2 tsps. (5 g) between the apples and blackberries.
*** For pies, you need to be careful with the apples you select. When choosing your apples, especially for a liquidy pie, it’s important to consider the amount of pectin (a natural “glue”) present in the apple. For the reasons listed in the linked article, I chose Granny Smith apples instead of those listed in Heroes’ Feast.

The first change to make is with how the apple filling is prepared. Cooking the apples on the stove, instead of in the microwave, will allow the juices released from the apples to have a caramel-like consistency instead of staying super watery. I adapted the method from King Arthur.
First, in a large pot, whisk together 1⁄3 cup of the sugar, the cinnamon, 1 tbsp. + 1 tsp. cornstarch, and ¼ tsp. salt. Add the apples and gently mix to combine.
Turn the heat to medium-low and allow the apples to warm up, about 10 minutes, stirring occasionally. Then, allow them to cook for an additional 10 minutes, stirring occasionally (top-left picture).
You’ll know they’re done when you can bend the slices without them breaking (top-right).
TIP: To get the apples all to a uniform size, I recommend using an apple corer. Here’s the one I use.

The second change to construction is with the pie crust. In order to prevent the liquid in the pie from infusing with the uncooked dough and turning it mushy, we’re going to firm up the bottom crust by blind-baking (partially cooking) it before adding the filling. To blind-bake, I’ve condensed the method from Sally’s Baking Addiction.
On a floured work surface, roll out the pie dough into a 12-inch (~30 cm) circle. Transfer it to a deep-dish pie plate and fit it in gently by lifting the edges of the dough as you gently press it into the bottom and sides of the pie dish. Leave ~1-inch overhang around the rim and trim the extra (picture 1) ). Do not dock (prick holes in) the bottom crust yet. Set it in the fridge to chill for 30 mins. Preheat the oven to 375℉ (190℃).
Next, crinkle up a piece of parchment paper large enough to cover the pie dough. Place it in the baking dish and weigh it down using ceramic pie beads, dried lentils, or dried beans. I used pinto beans. This will allow the crust to cook without bubbling at the bottom or shrinking too much away from the edges (picture 2) ).
Place the pie plate onto a baking sheet and put it in the preheated oven to cook for 15-16 minutes. Take it out and carefully remove the parchment paper with the weights. Dock the bottom crust with a fork and return it to the preheated oven, without the weights, until the crust begins to turn a golden brown, another 7-8 minutes. Remove again from oven and set aside (picture 3) ). Preheat the oven again - this time to 425℉ (218℃).
TIP: You can reuse your blind-baked beans/lentils for future pies! So feel free to store them in their own labeled container for use at another time.

While the bottom crust chills, whisk together ⅓ cup of the sugar, the remaining cornstarch, and a pinch of salt in a medium-sized bowl.
Add the blackberries and gently toss to coat. Then, add the lemon juice and gently fold until the sugar mixture is moistened and syrupy.
Since the blackberries will release their juice as they break down, to reduce the liquid content, remove 1 tbsp. of the syrup and discard.

For attaching the top crust to the partially-baked bottom crust, I followed Food52’s method.
To assemble the pie, start by spreading the blackberry mixture evenly over the bottom crust and scatter the butter pieces overtop (picture 1) ).
Strain the apples through a colander, catching the liquid in a bowl, and spoon them on top of the blackberries. Pour half of the reserved apple syrup over the apples (picture 2) - I added the apple syrup, I just took the picture too soon rip)
On a floured work surface, roll out dough into a 12-inch (~30 cm) circle and place it over the apple mixture. To seal the edges, start by folding the top crust under the overhanging bottom crust as much as possible without breaking the bottom crust. Then, use a fork to crimp the top and bottom layers together (picture 3) ).
Beat the egg with 1 tbsp. water and brush it over the top of the pie crust - including the edges. Sprinkle the remaining 1 tbsp. sugar evenly over the top. Place the pie into the oven preheated to 425℉ (218℃) (picture 4) ).

Bake the pie at 425℉ (218℃) until the top is light golden brown, about 25 minutes. Then adjust the heat to 375℉ (190℃), rotate the baking sheet 180 degrees, and continue baking until the crust is golden brown 25 to 30 minutes.
NOTE: I found my crust turned golden brown after 25 mins at 425℉ (218℃). I still adjusted the heat to 375℉ (190℃) and let it cook for the remaining time. However, I kept an eye on it to make sure it didn’t burn (it didn’t).

Remove pie from oven and baking sheet and allow to cool to room temperature on a wire rack, about 2 hours.

From the pictures above, you can see how changing up the steps in the construction helped with the structural integrity of the pie:
Using extra cornstarch allowed both fillings to thicken more while cooking, helping to create a distinct layer for the blackberry mixture (top-right);
Using Granny Smith apples allowed for the extra pectin in the apples to thicken the liquid on the stove and keep additional juices trapped inside the slices as they baked in the oven (also keeping the apples from drying out in the oven);
Cooking the apples on the stove gave the apple syrup a more caramel-consistency instead of staying watery;
Not only did blind-baking the bottom crust keep the vast majority of the liquid inside the pie as it cooked (top-left), but having an extra-crispy bottom crust allowed any pie kept as leftovers to have a distinct bottom crust instead of it becoming soggy;
Removing a little bit of the syrup from the blackberry mixture allowed the blackberry syrup to become less soupy and thicken into its own distinct layer (top-right).

Tl;dr: to recap what improved the construction of the pie:
Use a little extra cornstarch. Not much, just an extra tsp. (3 g) per filling will do.
Choose the right apples for the job. You want to make sure the ones you choose have enough pectin to keep in most of their juices. Solution: use Granny Smith.
Cook the apples on the stovetop. Using the stovetop allows for the juices released from the apples to have a caramel consistency instead of staying watery.
Blind bake the bottom crust. To keep the liquids from infusing with the bottom crust, partially bake the bottom crust using the listed method.
Remove 1 tbsp. of liquid from the blackberries. They have plenty of liquids to start and will produce more when they start to break down.
Overall, I would give this pie a 5/5 after the modifications to construction. The sweetness from the apples and the tartness from the blackberries really work to bring this together in the best way.
As mentioned in the intro, I really appreciate the fact that there is very little sugar added. Not only does it let the filling stand out on it’s own, but it also makes the pie enjoyable to those who don’t have as much of a sweet tooth.