How To Upsize Clothes:
Upsizing clothes! There are a million upcycling tutorials for clothes that are too big, but so few on how to make too small clothes you still love bigger!
Thank you for your suggestion! We all go through weight fluctuations in life, so it stands to reason our clothes should be able to fluctuate with us.
Resizing your clothes used to be a very common practice before the advent of fast fashion. Fast fashion sizing is extremely flawed, especially when it comes to plus size fashion, and we're stuck with a lot of vanity sizing, so it's a good skill to have regardless of whether you're looking to mend something old or buy something new.
How to upsize clothes:
Introduction:
There are many different ways to make a garment larger. The following list is not exhaustive, just a few ideas to get you started.
Grading patterns:
If you're making your own clothes, it's always useful to know how to modify a sewing pattern. The easiest way to adjust a pre-existing pattern to your size is slash and spread grading. First, you need to define which spots on the pattern need extra space. You then cut your pattern in that spot, and slide the resulting pattern pieces away from each other until you've got the size you need. Use paper to fill in the gaps. To ensure the resulting pattern makes for well-fitting clothes, make a mock-up and add, move, or remove darts where necessary to adapt it to your body type.
The image below shows potential slashing lines on a set of standard pattern blocks. Each line is a spot that allows you to add extra space. To read more about this process, check out the corresponding article by Threads Magazine.

(Image source) [ID: a diagram of slashing lines on a pattern block for a dress, bodice, skirt, sleeve, and a pair of pants.]
To make your clothes easier to let out in the future, make sure to provide ample seam allowance when cutting out your pattern pieces. This surplus fabric has several different uses, including giving you some wiggle room for when you need to size up your garment.
Now, let's take a look at pre-made garments.
Lengthening clothes:
A garment that's too short on you is easy to modify. Just add more material!
If it's a skirt or a dress, add ruffles to the bottom. Ruffles are easy to make by hand or with a sewing machine. You could also add lace, or wear the item with an underskirt.
For pants, let down your hem or sew on a new cuff. If this isn't enough, maybe consider turning your trousers into capri pants or shorts.
As for shirts, sewing an extra layer to the bottom edge is the easiest way to go, too. You could even combine two shirts into one to get an extra long shirt.
Another option is to cut your item in two and insert extra fabric between your separated garment parts.

(Image source) [ID: a pair of blue pants with cuffs sewn onto the bottom of the legs to lengthen them. The cuffs are made out of a fabric with a blue and brown geometric print.]

(Image source) [ID: a before and after picture of a red t-shirt that was lenghtened by adding in a patch of colourful fabric at the waist.]
Letting out seams/darts:
Remember how we made sure to have ample seam allowance earlier? When a garment has surplus fabric in the seams and you only need a little extra space, you can undo the seams of your garment and sew them back together again, this time with a smaller seam allowance than before. The Spruce Crafts has a pretty good tutorial on how to let out seams. You won't be able to make major size changes using this technique, but if you only need a few centimetres, this is a good way to go.
A lot of garments also have darts. Darts are fabric folds that are sewn down in strategic places to help the fabric follow the body's curves. If a dart doesn't fit you the way you want it to, then unpick the dart and try on the garment. Either leave the dart open, or pin the dart in place however you want it, then take off the garment again and sew the dart back together.
Be careful not to rip the fabric when using a seam ripper. Also note that removing entire darts may change the garment's fit.
You can also add custom darts to achieve a better fit, but that's a topic for another time.

(Image source) [ID: twelve different types of darts on a feminine bodice block.]
Adding extra fabric to your garment:
If we need to add more room than seam allowance or darts can provide us with, we need to add extra material. Remember those slashing lines we looked at earlier? If you're working with a pre-existing garment rather than a pattern, those are the perfect places to chop up your clothes and add in extra fabric.
Check your sewing stash for fabric that's similar in weight and material to your original garment, or go thrift shopping for an item you could use to upsize your garment. Long skirts and maxi dresses are a great source of fabric for alterations like these!
Lace inserts are also a fun choice to add some room, and if you're working with a knit item, you could even knit or crochet your own custom insert.
Define the area where you want to add extra fabric on your item, and measure how much you need. Draw a straight line on your garment with chalk/soap. Make sure the line doesn't cross any important structural or functional parts of your garment like darts or button holes: refer to the slashing diagram we saw earlier if you're not sure what spot to pick. Cut the line open (or unpick the seam if it's situated on a seam), and add in your extra fabric. Finish off your new seams so they don't unravel later on, and you're done!
You can add straight strips of fabric for extra width or length, or you could use flared panels or even godets to make your item flair out.
Want to see this technique in action? Check out this video by Break n Remake:
Some ideas:
This Pinterest user cut a straight line down the front of a t-shirt and inserted a lace panel to add extra width in the front of the garment.

(Image source) [ID: a blue t-shirt with a panel of dark blue lace added in at the centre front.]
Busy Geemaw cut open the side seams of a shirt and used flared panels to add some extra width in the bust and hip area.

(Image source) [ID: a green and white long-sleeved shirt with a striped flared panel in matching colours inserted at the side seam.]
This person added a panel to the sides of a pair of jeans to give them more space in the hip area. You could easily use a long straight panel or a panel that flares at the bottom to resize the entire garment instead of just the hips, or use a wide piece of elastic for extra stretch.

(Image source) [ID: a side view of a pair of light blue jeans with a dark blue wedge-shaped denim insert running down from the waist and ending above the knee.]
This person added a godet in the back of their shirt in order to get more space in the back.

(Image source) [ID: a blue and white plaid shirt with a white lace godet inserted in the back.]
Blue Corduroy enlarged a pair of shorts by opening up the side seams and adding in strips of fabric.

(Image source) [ID: blue denim shorts with a floral fabric insert at the side seams.]
You don't need to resize the entire garment if you don't want to. For example, One Brown Mom turned this ankle-length skirt with a too small waistband into a well-fitting knee-length skirt by taking advantage of the skirt's flared shape.

(Image source) [ID: a woman wearing a black shirt and a brown tartan knee-length skirt.]
Conclusion:
Throughout our lives, our weight will fluctuate and our bodies will change. There's no shame in this: it's just a fact of life. Therefore, knowing how to upsize an item that is too small for you is a useful skill to learn.
If you want more inspiration, check out these projects by Confessions of a Refashionista, One Brown Mom, and Thriftanista in the City.
More Posts from 00ff00dreams and Others
Hi. I don't know if this is out of line or anything and if you're uncomfortable with answering this ask then you should totally ignore me and all that but I was wondering if (seeing as you are hoh) you maybe had any advice or anything like that for writing a hoh character? (In general, but especially any knowledge about hearing aids would be greatly appreciated)
Sorry to bother
ok so im not sure what information i can give you on being hoh that you probably haven't already heard, BUT with hearing aids i can absolutely give you a couple tips!
when you first put them in in the morning, assuming you have hearing at all, there's a slight echo. that's your brain registering sounds through the hearing aids and through your normal ears. it fades after a few minutes but i've never seen that mentioned ever and i think it could be pretty cool to bring up in a story
hearing aids are not water proof. idk why you might need to know that but there you go
OH. when the wind hits your hearing aids it makes a goddawful sound like someone blowing into earbuds mics. even a slight breeze can do that and it's awful
idk if this is common but my hearing aids have a startup jingle so when you turn them on or take them out of the charging station they do a little ditty. i can try to upload a video later if you're curious
um. if you're writing the character really early on, having just gotten hearing aids, everyone talks about the wonder and awe that comes from hearing rain, birds, cats purring, whatever, but i haven't seen anyone mention the blisters you get in your ears? the little bastards aren't very comfortable, even if they are cool.
also the plastic little sports guard thing that helps keep the aids in your ears can chafe.
if your character has a mask or glasses, those are pretty tough to wear with hearing aids. my glasses keep nudging my aids off the top of my ears and making them fall out
last thing isn't a hearing aids thing, but it is a hoh thing- please don't feel like you have to make your character speak sign language. i only know the very very basics of asl, and as much as i appreciate people trying to learn it to talk to me, i really wish that wasn't viewed as a mandatory part of being hoh/deaf
to anyone in the areas impacted by the wildfire smoke, my #1 biggest piece of advice as someone whos been dealing with wildfire smoke in the NW united states for years, is build yourself a Corsi-Rosenthal Cube

they perform as well as expensive HEPA air cleaners, and are comparatively VERY inexpensive. all you need is a box fan, 4 air filters, a piece of cardboard, and some duct tape!!!!
i think it took us maybe a half hour to put ours together, if that, and we replace the filters every 3 months. it's really made a HUGE difference, both when the air quality is bad, but also with our allergies

i made a free to use, 100% customizable comment widget for neocities users! it's really easy to install and add comment sections to any page. no more boring cbox or external guestbooks if you don't want them! and it comes with two themes to get you started!! please enjoy! you can find it here on my personal site!


some sites for when you’re bored and looking for new music
spotalike creates a playlist based on a song
magicplaylist creates a playlist based on a song
dubolt creates a playlist based on an artist
boilthefrog creates a playlist between any two artists
predominant suggests you albums based on cover art color
music-map suggests similar artists
gnoosic suggests similar artists and songs
RIP Joann, now what?
I wanted to make a post I could copy and paste and or link when I see folks asking where to buy fabrics when Joann is gone. I sew a lot, generally between 100-200 items a year and I don't do it on a big budget. Stores are not in a particular order.
Notions:
Wawak.com - start here, mostly stay here. Wawak is a supplier for professional sewing businesses and have the prices that show it. I will not pay for gutermann Mara 100 anywhere else. I buy buttons, tools, thread, and most elastic here.
Stitch Love Studio - this is where I buy lingerie supplies https://www.etsy.com/shop/StitchLoveStudio?ref=yr_purchases
Fabric:
Fabric Mart - this is one where you want to sign up for emails and never buy unless its on sale. They run different sales every day and they rotate. Mostly deadstock fabrics but I buy more from here than anywhere else. Fantastic customer service and if you watch you can get things like $6 wool suiting or $4 cotton jersey. https://fabricmartfabrics.com/
Fabrics-Store - again, buy the sales not the full price. Sign up for the emails but redirect them to a folder because it is TOO MANY. They stock linen or good but not amazing quality. https://www.fabrics-store.com/
Purple Seamstress - This is where I buy my solid cotton lycra jersey. They have other things, but the jersey is what I'm here for. Inexpensive and very good quality. If you ask she will mail you a swatch card for the solids. https://purpleseamstressfabric.com/
LA Finch - deadstock fabrics with a fantastic remnant selection https://lafinchfabrics.myshopify.com/
Califabrics - mix of deadstock and big brands, easy to navigate and always seem to have good denim in stock. https://califabrics.com/
Boho Fabrics - good variety, nice bundles. I have also gotten some really great trims from here. https://www.bohofabrics.com/
Firecracker Fabrics - garment and quilting fabrics, really nice selection and great sale section. I've bought $5 yard quilting cottons here several times. https://www.firecrackerfabrics.com/
Hancock's of Paducah - Quilting fabric and some limited garment fabric. AMAZING sale section. Do not sleep on the sale section. This is my first stop when buying quilting fabrics. Usually the last stop too. Not particularly speedy shipping. https://www.hancocks-paducah.com/
Itokri - This is something a little different. Itokri is an Indian business with incredible traditional fabrics. Shipping to the US is expensive, but the fabric is so inexpensive it evens out. I generally end up paying like $30 for shipping. Beautiful ikat and block prints. https://itokri.com/
Miss Matatabi - this is a little treat. This isn't where you go to save money, but there are so many beautiful things in this shop. Ships from Japan incredibly quickly. https://shop.missmatatabi.com/
Lucky Deluxe - Craft thrift store, always has an incredible selection and fantastic customer service. I need to close the tab fast because I never go to this website without finding something I need. https://www.luckydeluxefabrics.com/
Swanson's - the OG of online craft thrift stores, but I find their website harder to navigate. https://www.swansonsfabrics.com
Honorary Mentions: I haven't shopped at these places yet but I have had them recommended and likely will at some point.
A Thrifty Notion - https://athriftynotion.com/
Creative Closeouts - https://creativecloseoutsfabric.com/ being rebranded to sewsnip.com on March 1 - quilting deadstock
Hawthorne Supply Co. - I just got this rec and I think I need to not look too closely or I'm going to slip with my debit card. https://www.hawthornesupplyco.com/
This is not an exhaustive list of everywhere you can buy fabric, or even a full list of where I shop. There are SO many options out there in the world. You also need to think outside the fabric store box. I thrift men's shirt fabrics for quilts and sheets for backing fabric. I don't do a ton of in person thrifting and my local stores don't get a lot of craft materials but every thrift store is its own universe and reflects the community it is in. Go out and find something cool.
Oh and final note: Don't shop at Hobby Lobby.
spec. spec. spec youve changed the game. i never realized your pointer finger and your wrist artery are the same. holy shit. im going to draw hands thank you


aasdjsd its not really an artery but its a useful landmark to facilitate the Flow of a pose imo
Okay listen I have another disability related thing that’s important!!
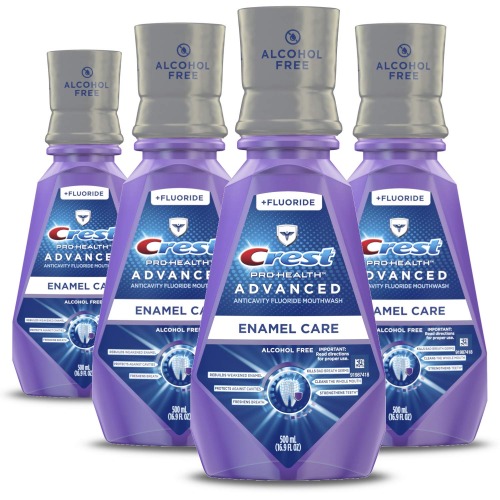
If you have any disabilities linked to tooth decay/erosion, through direct cause or secondary symptom, it is vital that you get one or both of the following items: Sensodyne toothpaste and enamel repair mouthwash

This includes health conditions such as acid reflux, diabetes, thyroid conditions, fibromyalgia, chronic pain & mental illnesses such as depression that create poor hygiene routines, sensory issue disorders like autism and ADHD, and any health condition that causes frequent vomiting / increased stomach acid, including eating disorders and migraines.
All of these disabilities will erode the enamel of your teeth, not only opening you up to cavities but making it very easy to chip your teeth from such simple things as biting the wrong way on the tines of a fork. (I’ve chipped my teeth at least 4 times this way).
The toothpaste on the left here (sensodyne pronamel) is gentle on your teeth, won’t cause painful sensations from any extreme mint flavor, and will even protect your gums if they’re sensitive from any of these conditions.
The mouthwash on the right (Crest enamel repair) will, as it says, repair your enamel — which is marvelous, because the technology to repair your enamel at all is relatively very new to society! — but it is most importantly non-alcoholic. Meaning that it works well as a once-a-day rinse without any of the burning sensations of antiseptics that typically discourage people with sensory issues from taking care of their teeth.
I know remembering to do these things every day can feel like a lot when you’re sick and exhausted, but I promise a collective three minutes out of every day is going to save you an incredible amount of pain and money in the future. If your teeth are susceptible enough to rot, you can actually die from infection. And as they say, with how little insurance actually covers dental —
Not brushing your teeth??
In THIS economy???
as an aroace person with limited sexual experience, no interest in watching porn, and poor sex ed as a teen, there IS something simultaneously funny and vaguely tragic about being 28 adult years old and realising how extremely tiny your frame of reference is for genitalia and deciding you should expand this to better understand bodies (yours and others). and then you're just there like "okay so what the fuck do I even google right now, anyway"
-
 mysterioustactician reblogged this · 2 weeks ago
 -
 mysterioustactician liked this · 2 weeks ago
 -
 darnedanddarted reblogged this · 2 weeks ago
 -
 cakeisace reblogged this · 2 weeks ago
 -
 starlight-in-a-bottle reblogged this · 2 weeks ago
 -
 zombieelmyra reblogged this · 2 weeks ago
 -
 zombieelmyra liked this · 2 weeks ago
 -
 feralplantwife liked this · 2 weeks ago
 -
 beks-crooked-glasses reblogged this · 2 weeks ago
 -
 beks-crooked-glasses reblogged this · 2 weeks ago
 -
 beks-crooked-glasses liked this · 2 weeks ago
 -
 clitoroid reblogged this · 2 weeks ago
 -
 cadhalash reblogged this · 3 weeks ago
 -
 4yoourinfo reblogged this · 3 weeks ago
 -
 thepipfalcon reblogged this · 3 weeks ago
 -
 djsandstorm liked this · 3 weeks ago
 -
 spacecores liked this · 3 weeks ago
 -
 saffirewolf666 reblogged this · 3 weeks ago
 -
 lets-pin-that reblogged this · 3 weeks ago
 -
 owlfins liked this · 3 weeks ago
 -
 bubblejuices liked this · 3 weeks ago
 -
 muenstersinc reblogged this · 3 weeks ago
 -
 148km reblogged this · 3 weeks ago
 -
 swinging-stars-from-satellites liked this · 4 weeks ago
 -
 ladyzayinwonderland reblogged this · 4 weeks ago
 -
 ozomatli liked this · 4 weeks ago
 -
 noodle78ek reblogged this · 4 weeks ago
 -
 beetrans reblogged this · 4 weeks ago
 -
 angrydorito liked this · 4 weeks ago
 -
 run3ll liked this · 4 weeks ago
 -
 bishonenrockmysocks liked this · 4 weeks ago
 -
 kaeyslay liked this · 4 weeks ago
 -
 simplych4i reblogged this · 4 weeks ago
 -
 simplych4i liked this · 4 weeks ago
 -
 taxifurbied reblogged this · 4 weeks ago
 -
 taxifurbied liked this · 4 weeks ago
 -
 forest-of-wonderful-things reblogged this · 4 weeks ago
 -
 share-the-skye liked this · 4 weeks ago
 -
 emosnakeboy reblogged this · 4 weeks ago
 -
 emosnakeboy liked this · 4 weeks ago
 -
 leoaustralis liked this · 4 weeks ago
 -
 melanch0lic-pers0n reblogged this · 4 weeks ago
 -
 fokron liked this · 4 weeks ago
 -
 fokron reblogged this · 4 weeks ago
 -
 diamonddustdebris reblogged this · 4 weeks ago
 -
 kaosasura reblogged this · 4 weeks ago
 -
 facebookargumentasmr liked this · 4 weeks ago
 -
 kaosasura liked this · 4 weeks ago
 -
 reesemh liked this · 4 weeks ago
 -
 forrysstashofgoodies reblogged this · 4 weeks ago

blog created as an archive of posts i would want to save for various reasons
154 posts
