Zelo-ref

More Posts from Zelo-ref and Others


How To Shade
a quick tutorial on shading (with graphite) by yours truly. this is the process I use for shading, and there are tons more out there if this one doesn’t work for you.
MATERIALS USED

1 HB graphite pencil
1 2B graphite pencil
1 4B graphite pencil
1 blending stub (the bigger the better)
1 plastic eraser (white)
1 kneaded eraser (grey)
now why do I use two erasers? well, they’re very different from one another, and each serves their own purpose.
the plastic eraser is harder, and when it erases, it erases everything. the kneaded eraser is soft, and it doesn’t completely erase everything all at once. you can use it to pick up some of the graphite and leave some behind, lightening (but not totally erasing) your shading. plus, the kneaded eraser is so soft you can mold it, and it doesn’t leave pencil shavings. if one end gets too used, you can just stretch it out, and it’s as good as new.
REFERENCE USED

now lets get this started, shall we?
STEP ONE
scribble lightly over your drawing with either an HB (aka a regular #2 pencil) or 2B pencil. you don’t have to be extremely neat, but do it light and nice enough so it can still be erased/you can still see the original lines underneath.

STEP TWO
take your blending stub (the wider the better, and if you don’t have one, use a tissue) and rub in the opposite direction of the scribbling. don’t press too hard, because it might streak/not work if you do.


STEP THREE
erase the extra shading around the edges (using the plastic eraser.).

STEP FOUR
roughly add your darks

STEP FIVE
roughly add your lights by erasing with the kneaded eraser

STEP SIX
add your finishing touches (secondary shadows, background, etc)

(I reshaped the sides, added more lights, and added the background shadow)
and voila! you just did some shading!
Is there any chance you could give some tips on how to get better at accuracy? I feel like no matter how much I practice, I can't get poeple to look right. Even if I trace, it doesn't look right (which is funny to me considering how often people accuse you of tracing--seriously have they ever tried it?). You make it look so easy, and I feel like it's the hardest part of drawing.
Okay three things first:
It is the hardest part of drawing.
Tracing will actually set you back unless you do it the right way.
You don’t have to be accurate to make good art.
I grabbed a random screencap to show you how I do it (keep in mind that I’ve made thousands of drawings at this point in my life, so a lot of this is stuff I don’t even stop to think about anymore, so I apologize if any of my advice sounds muddy or confusing):

The first thing I do is note the positive and negative spaces and distances between them (marked in pink and blue below):


I reversed the colors so you only see the spaces for what they are. Look at the black space in particular because that’s the barrier between the two major halves of the entire space.
I also note the angles of things:

And then I start to sketch.
First I break up the space and mark out the major axis of the figure (a good rule of thumb with figures is to draw where their spine would be, and perhaps where their shoulders are as well—you don’t have to do it this way of course but if you’re having trouble seeing an axis, it can be helpful):

Then I start to mark out the major shapes, using each previous set of marks to help me refine things. Some people use circles or scribbles or even whole chunks of light and dark. There are an infinite ways to block out a drawing, but I’ve found that angles and lines work best for me:


You’ll see above that I made a cross for his face the same way I made a cross for his body to marke the center line and where his eyes would be. If you want to practice these angles, something like a fashion magazine works great. Get some paper and just flip through each face and try to copy the angles you see.
Anyway, so then I slowly refine details using the lines and angles to help me see how things are shaped. I can build the shapes of fabric and muscle over the angles as if they were a wire skeleton:


And that’s basically it!
Now, to address tracing…
There are two ways you can use tracing to help you. The first is to pinpoint landmarks, like the corner of a shoulder or the eyes. You can do this by making a dot—and only make as many dots as you absolutely need. Too many, and tracing becomes a crutch, and you want to help yourself learn, not skip over learning. I don’t recommend tracing any lines.
You can also use tracing to repair what you’ve done.
Here’s my sketch overlaid onto the screencap:

It’s pretty good! I don’t have to fix it if I don’t want to, but if I want, I can use tracing to mark the places where things are a little off:

And then I can go back and adjust.
This trick is really useful for helping you see the mistakes you keep making so that you can work at correcting them. For example, I tend to make eyes too big and shoulders too wide. I don’t always need to fix that, but this method helps.
The idea isn’t to make drawing easier but to make learning easier, you know? That’s why you want to be careful with tools like tracing (or even gridwork) because you’ll find that you’re not giving yourself enough of a chance to learn. That’s also why tracing can’t replace skill.
Anyway, like I said, you don’t have be accurate or mechanically perfect to make good art. These are just some tips to help you see in observational art and to be more confident. But remember that sometimes the best and most beautiful art is a mechanical mess.
Here’s Van Gogh’s room as proof:

Good luck! <3


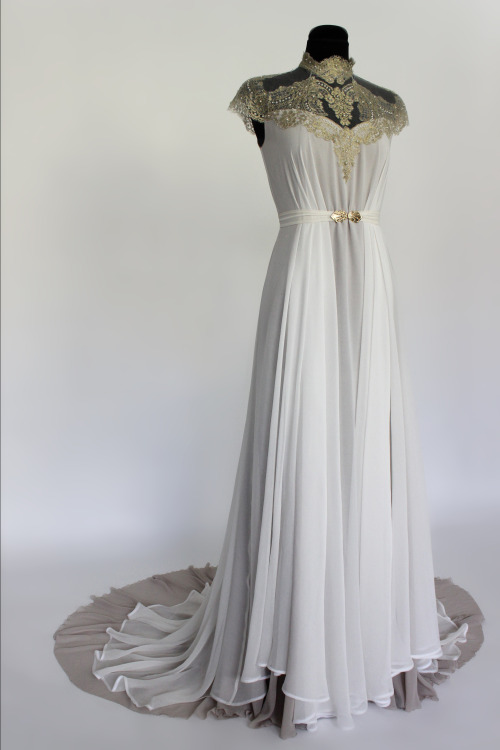

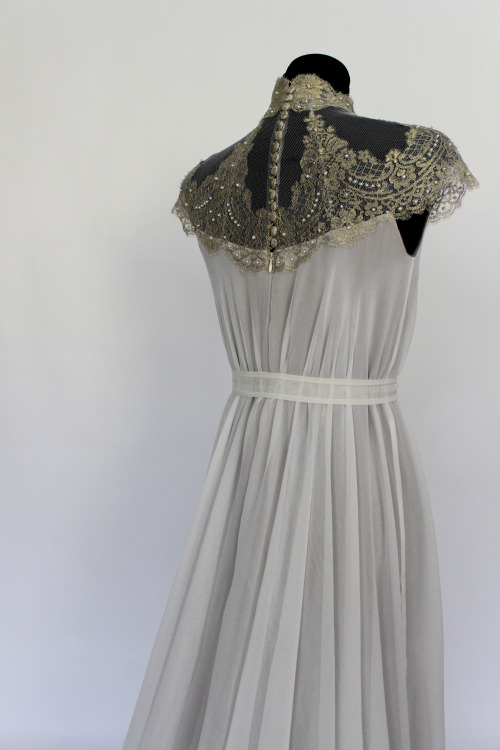
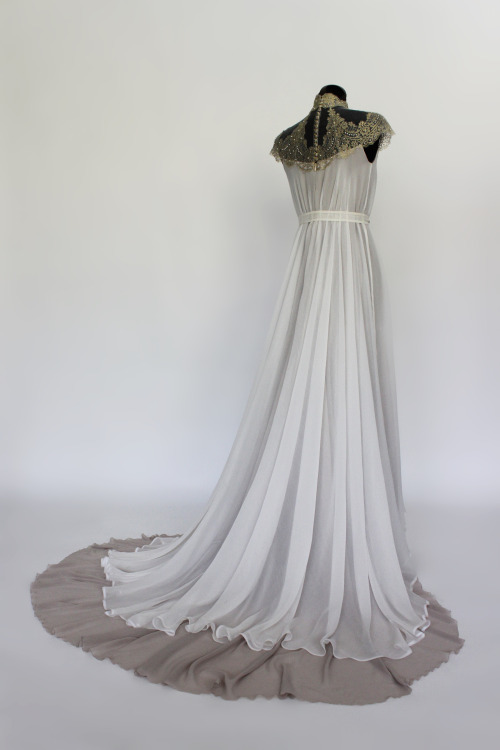
Art Nouveau inspired wedding dress, made of 3 layers of golden shimmering taupe chiffon, upper layer of pure silk, and golden French wedding lace along the neckline embellished with numerous little pearls.
Mail to lindafriesen.info@gmail.com if you’d like to have a unique custom made wedding dress designed for you.
www.facebook.com/LINDAFRIESEN.couture


(If you haven't answered this before) how do you do shading?
i havent !! and. i cant say this is gonna be any help but heres some of the things i try to keep in mind when im shading stuff

so youve got your flats on your initial drawing, the thing thats getting the business

then youve got find out where the light is coming from ! your light source is gonna determine where all the highlights and shadows are cast, and while it doesnt have to be EXACT, its generally a good rule to keep it pretty consistent through the drawing - sometimes youll probably have to deal with multiple sources, and each ones gonna be casting its own light and shadow ( and color by extension )

the intensity and sharpness of your shadows generally also reflects the brightness or closeness of the light ! basically if you wanna make something look BRIGHT, you gotta make sure the shadows are dark enough to get the idea across

so the actual shading part - the way i shade is by getting a brush on a very low opacity, picking the color i want for shadows and then layering the strokes over and over until i get about the darkness i want ( because im LAZY and i dont actually work with complex backgrounds a bunch, i can usually get away with drawing the shadows directly on the locked flat colors layer so theres nothing to clean up after )

afterwards i clean it up a little if i need to, add highlights while keeping in mind where the light is coming from, and start on the Detail Work ( it also might be helpful to keep in mind that highlights dont always go on the EDGE of things, but rather where the curve of something is - where the light would catch. this can help add a little depth and make flat things look rounded out ! )

and THEN its basically me zooming into the drawing at least 200%, putting another layer over the top of everything, and going over the outlines with a tiny brush so the harsh black is mostly gone ! there shouldnt be anything along the edge thats darker than the darkest part of the shadow ( with exceptions like the eyes and nostrils )
and thats mostly it ! i picked red for the shadow color, but picking your shading ( and flats ! ) based on the colors in your background can go a LONG way into making it seem like your character is actually in the environment

reflective light is also an important thing to keep in mind when choosing shadows and highlights - light and color doesnt always just hit an object and stay there, and even in the shade there could be light bouncing back from stuff like water or grass creating smaller, subtle highlights along the edges of things close by
not everything reflects the same way either ! something like a piece of wood is going to react differently than say, a metal ball

so you get your light source, basic highlights and shadows, not bad ! but then theres ALSO the light reflecting from the rest of the environment along the edge of the ball, and then finally the color from both the dragon and the ball reflecting a bit on each other
honestly though these arent RULES of drawing and more just guidelines i work with sometimes, and maybe your style of shading and highlighting looks completely different than this and thats ok !! - im still figuring a bunch of stuff out about light and reflections myself, and the great thing about art is that you can do whatever the hell you want with it

-
 eyeballmouth liked this · 1 week ago
 -
 coolclothestorefrence reblogged this · 1 month ago
 -
 shadowwalkingfool reblogged this · 1 year ago
 -
 iwillhaveamoonbase liked this · 2 years ago
 -
 benizistuff reblogged this · 2 years ago
 -
 daengeli reblogged this · 2 years ago
 -
daengeli liked this · 2 years ago
-
 elishevatzviya liked this · 3 years ago
 -
elishevatzviya reblogged this · 3 years ago
-
 zomwis liked this · 3 years ago
 -
 canonical-mess liked this · 3 years ago
 -
 aalinaaaaaa liked this · 3 years ago
 -
 th3c0mebackk1d liked this · 3 years ago
 -
 etoile-blue liked this · 4 years ago
 -
 lunatara7136 liked this · 4 years ago
 -
 dragonsofidemon liked this · 4 years ago
 -
 idkthisisme liked this · 4 years ago
 -
 toxinspiration reblogged this · 4 years ago
 -
 toxinsomnia liked this · 4 years ago
 -
 dororibee reblogged this · 4 years ago
 -
 seraphbay reblogged this · 4 years ago
 -
 madebymaryssa liked this · 4 years ago
 -
 mynamemeansbumblebee liked this · 4 years ago
 -
 greensphynx-wrote liked this · 5 years ago
 -
 a-redharlequin reblogged this · 5 years ago
 -
a-redharlequin liked this · 5 years ago
-
 the-pen-and-the-sword reblogged this · 5 years ago
 -
 glamourhoney reblogged this · 5 years ago
 -
 myrnilee reblogged this · 5 years ago
 -
myrnilee liked this · 5 years ago
-
 ivatodorova liked this · 5 years ago
 -
 littleblueemoon liked this · 5 years ago
 -
 alexandra-ouat liked this · 5 years ago
 -
 kennyonwork liked this · 5 years ago
 -
 glittzysunflowermaze liked this · 5 years ago
 -
 pretentiousprojectaesthetics reblogged this · 5 years ago
 -
 hiiragi-daiaka liked this · 5 years ago
 -
 meltic-daze liked this · 5 years ago
 -
 khaleesiaveline liked this · 5 years ago
 -
 holychucky-blog liked this · 5 years ago