New Zealand’s New Water Safety Mascot Is Amazing And His Instagram Is A Gift
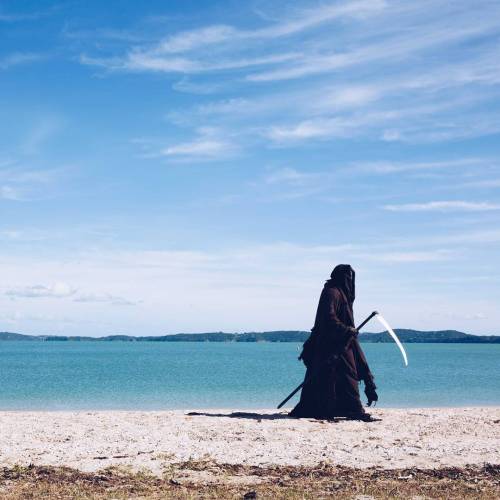
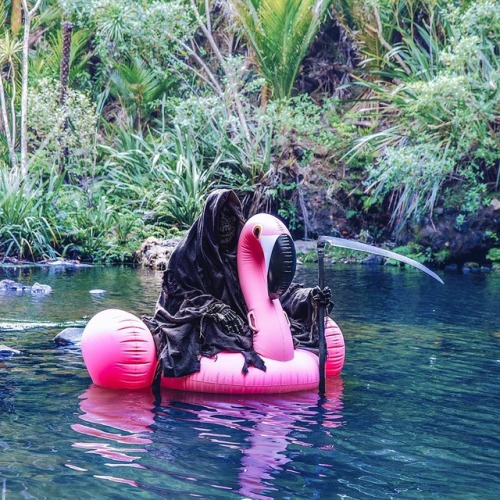
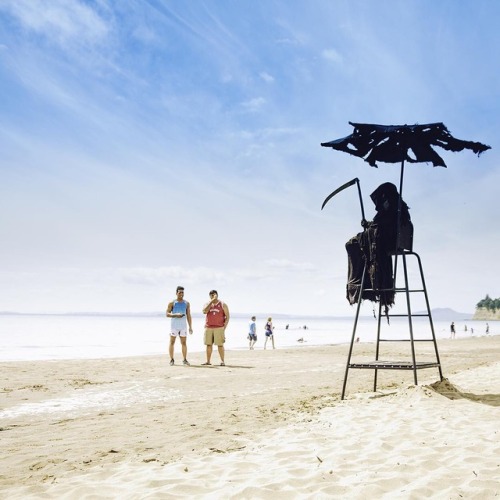
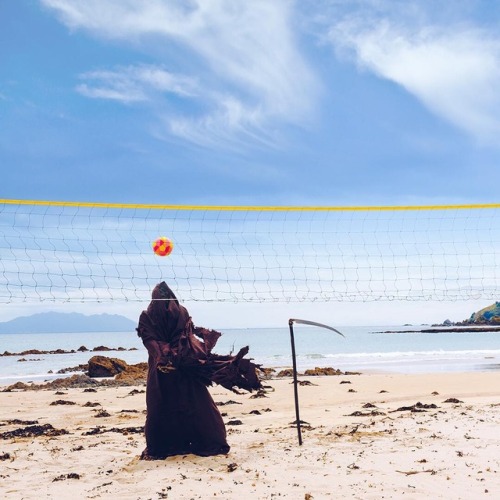
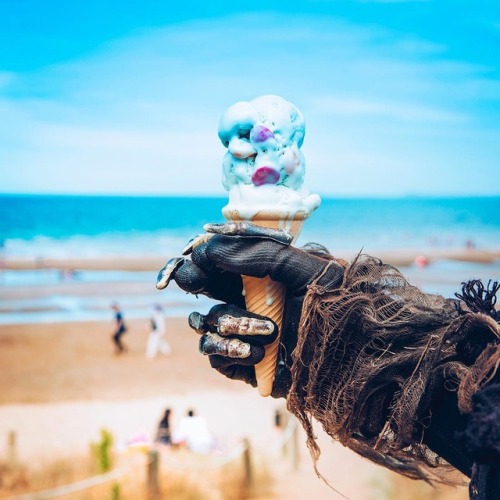
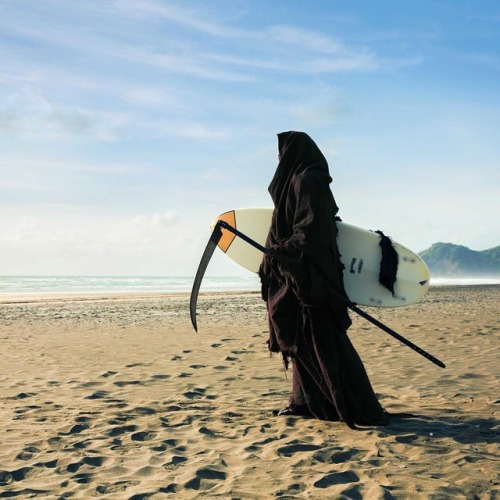
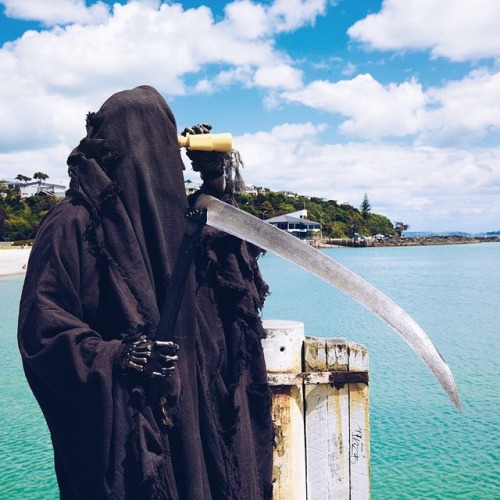
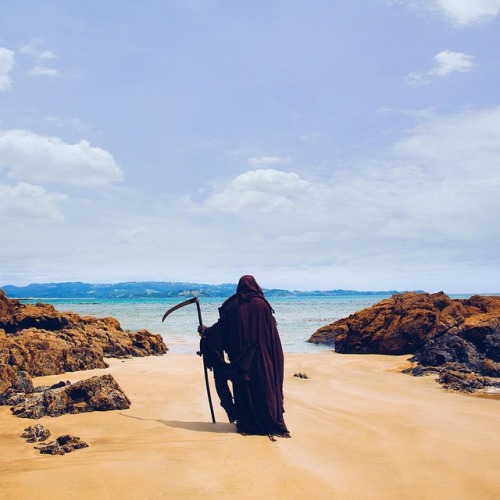

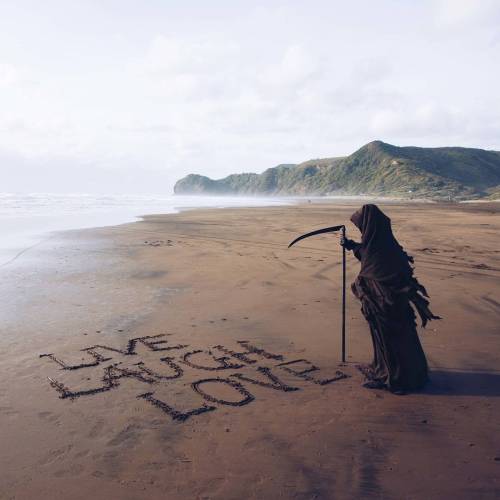
New Zealand’s new water safety mascot is amazing and his instagram is a gift
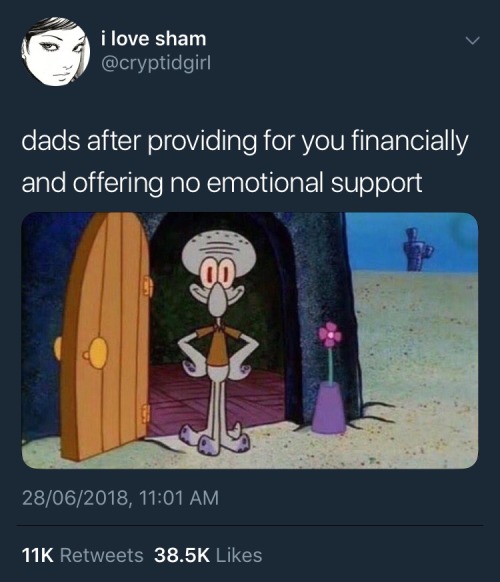
More Posts from Lilhaileyfoofoo and Others
I was getting pretty fed up with links and generators with very general and overused weapons and superpowers and what have you for characters so:
Here is a page for premodern weapons, broken down into a ton of subcategories, with the weapon’s region of origin.
Here is a page of medieval weapons.
Here is a page of just about every conceived superpower.
Here is a page for legendary creatures and their regions of origin.
Here are some gemstones.
Here is a bunch of Greek legends, including monsters, gods, nymphs, heroes, and so on.
Here is a website with a ton of (legally attained, don’t worry) information about the black market.
Here is a website with information about forensic science and cases of death. Discretion advised.
Here is every religion in the world.
Here is every language in the world.
Here are methods of torture. Discretion advised.
Here are descriptions of the various methods used for the death penalty. Discretion advised.
Here are poisonous plants.
Here are plants in general.
Feel free to add more to this!
ENOUGH
artistically-gay’s Hair Tutorial

So! before we begin, I wanna state that the program I use is Fire Alpaca, though this tutorial can be applied to different art programs as well! Some brushes and filters may work a bit differently from program to program.

First, we need to go over the brush checklist! These are the brushes you’re going to be working with: - Watercolor 1 (Turn ON size by pressure) - Watercolor 2 (Turn OFF size by pressure) - Airbrush
We’ll start off with a base color. A lightish color is the easiest to work with when you start out. A caramel color should work best for practice.

You’re going to want to duplicate the color layer. The duplicated layer is where most of the coloring is going to be done. Lock the first layer to make sure you don’t accidentally work on the wrong layer. I’ve had this accident several times and ended up wasting an hour or two.
You’ll need to have an understanding of color theory for this, but I’ll be linking a post at the end that can help give some guidance on shading with the say I do it!
We’ll be shading our caramel-colored strip with a dark red, and making highlights with a light and pale yellow!

Take Watercolor 2 and start creating strokes with varying pressure. Try and go lighter with the shading in where you want your highlights to be, and go heavier where the shadows will be.
Using Watercolor 2 gives you a guideline to follow before using Watercolor 1, which is where detailing will come in.
Now you start using Watercolor 1. Try and have it small, since this is the detailing brush and you’re trying to mimic the visuals of having individual hair strands. Remember to have lighter pressure where the highlights will be and heavier where shadows will be.

Duplicate this layer again with Watercolor 1, and then repeat this process with your highlighting color, in this case the yellow! After this, you can adjust the opacity oh this layer until you feel satisfied with how the highlights look!
Now it’s time to clip and merge the layers! After this, we’ll be moving on to the final steps, these steps involving the airbrush tool.

Returning to our dark red shading color, use the Airbrush tool to place some soft shading depending on your picture’s light source. After that, use the layer filter settings and either apply Multiply or Hard Light, it really depends on your preference*. Adjust opacity to your preference as well.
*personally, I like to use Hard Light more than Multiply.
Repeat this process with your highlight color. Use the layer filter settings and choose either Overlay or Soft Light. Again, you can go with whichever you prefer.

And that’s my hair tutorial! Feel free to practice and experiment with this method in any way that you like! I hope that I was able to be of help to the people who were interested!
Here you can find the post I mentioned about shading!


a couple more maccreadys I doodled earlier

"Faggot"


ITS HALLOWEEN! hope everyone has a good day/night 🎃😆
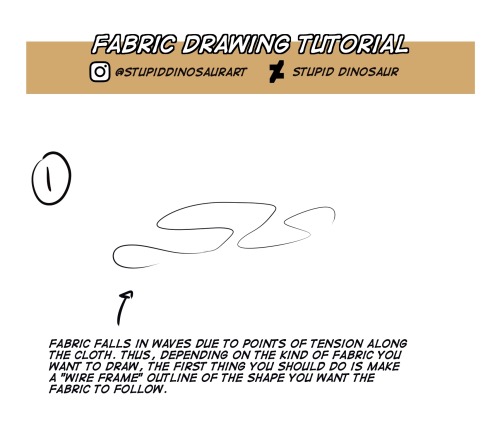
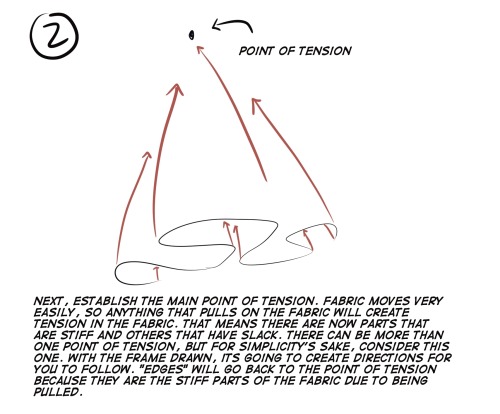
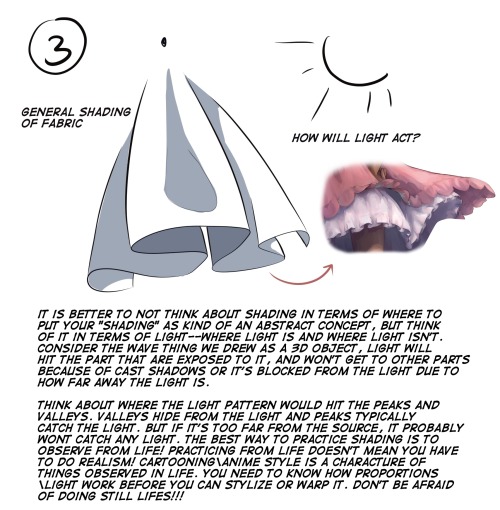
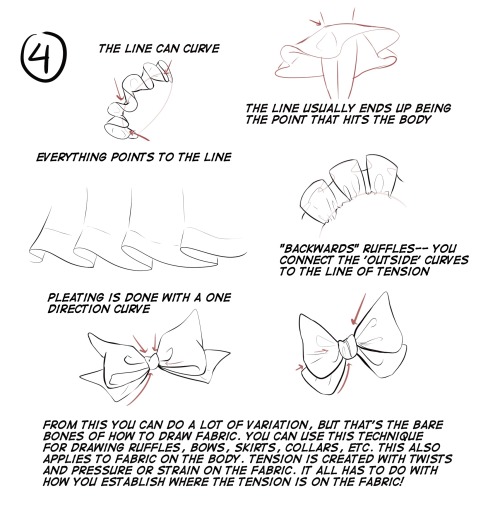
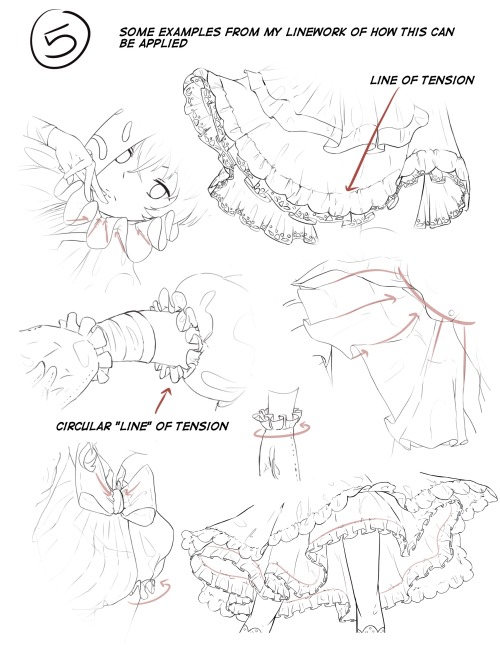
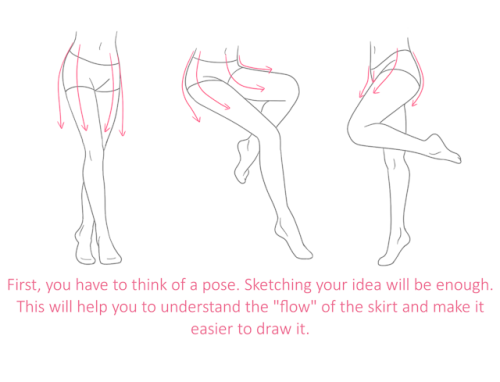
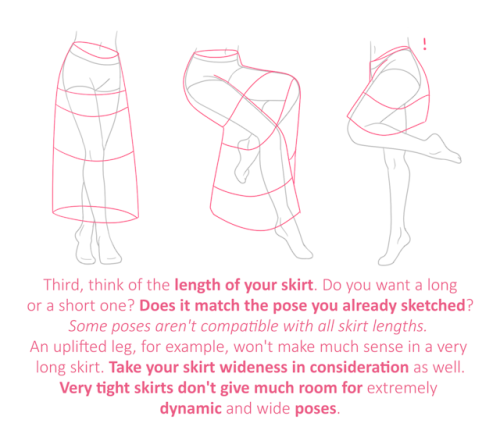
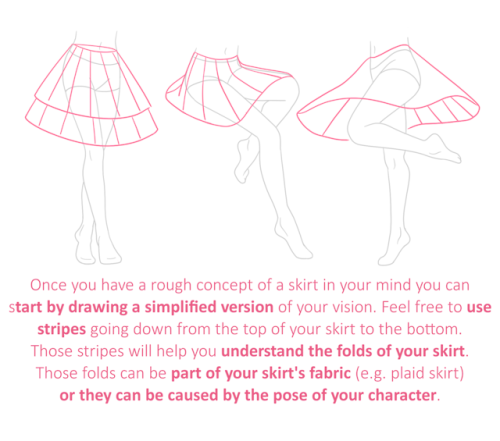
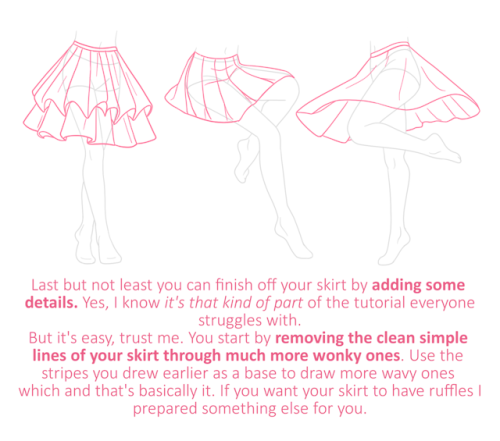
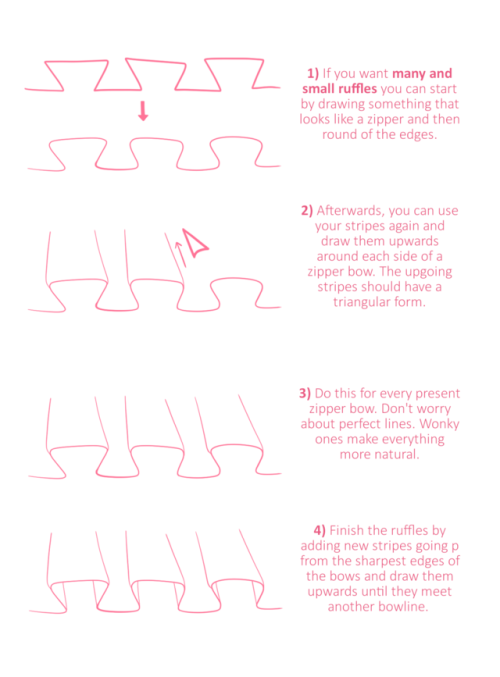
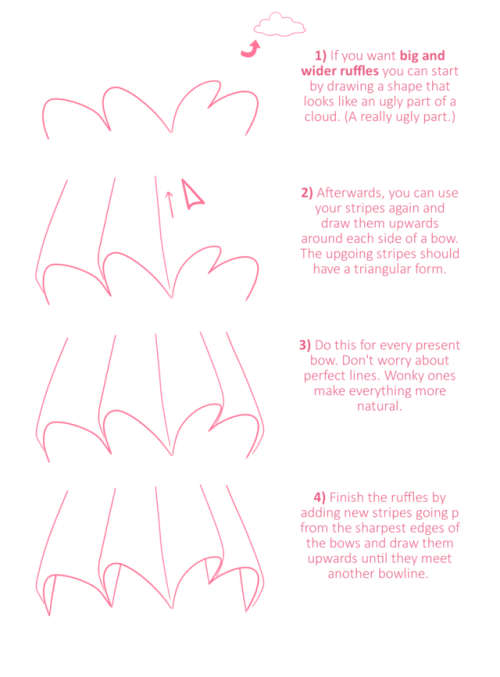
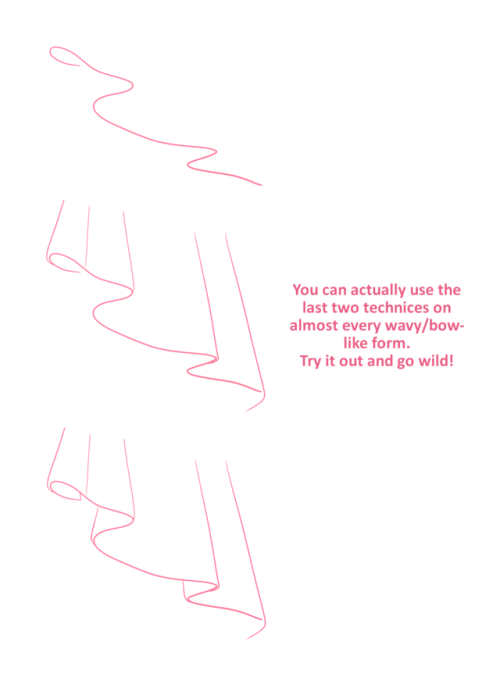
I’ve been getting some requests to make a tutorial on how to draw fabric. It’s really not that complicated when you break it down, but it’s still something people get stuck on and over complicate. Here’s my “bare bones” simple explanation as to how to draw fabric!


-
 xxueyangx liked this · 3 weeks ago
 -
 moo0ny7 liked this · 3 weeks ago
 -
 anomalyfromnowhere liked this · 3 weeks ago
 -
 bagofmice reblogged this · 1 month ago
 -
 kokouhaia liked this · 1 month ago
 -
 peace-love-pierogis reblogged this · 1 month ago
 -
 expressionless-fr reblogged this · 1 month ago
 -
 thenightlightpeep reblogged this · 1 month ago
 -
 midnight-soulless-system reblogged this · 1 month ago
 -
midnight-soulless-system liked this · 1 month ago
-
 divinesheikahblade reblogged this · 1 month ago
 -
divinesheikahblade liked this · 1 month ago
-
 sarcosmiiic reblogged this · 1 month ago
 -
sarcosmiiic liked this · 1 month ago
-
 ajcoca3 liked this · 1 month ago
 -
 malachimulligan reblogged this · 1 month ago
 -
malachimulligan liked this · 1 month ago
-
 eekwinn liked this · 1 month ago
 -
 glorious-absolution reblogged this · 1 month ago
 -
 cat-mermaid reblogged this · 1 month ago
 -
cat-mermaid liked this · 1 month ago
-
 wrath-of-medea reblogged this · 1 month ago
 -
 fullwonderlandwhispers reblogged this · 1 month ago
 -
 triplehcubed liked this · 2 months ago
 -
 thisshouldbeallisons reblogged this · 2 months ago
 -
thisshouldbeallisons liked this · 2 months ago
-
 saltwaterrivers reblogged this · 2 months ago
 -
saltwaterrivers liked this · 2 months ago
-
 t0ki reblogged this · 2 months ago
 -
 precioushoard reblogged this · 2 months ago
 -
 737fury67w7ehsblog liked this · 2 months ago
 -
 harrowinghaunting reblogged this · 2 months ago
 -
 ambreiiigns reblogged this · 2 months ago
 -
 jac-jon liked this · 2 months ago
 -
 cleath reblogged this · 2 months ago
 -
 iriatated liked this · 2 months ago
 -
 whore-a-scopes reblogged this · 2 months ago
 -
 babbyyspice liked this · 2 months ago
 -
 good-death-for-the-lonely reblogged this · 2 months ago
 -
 forevermoon reblogged this · 2 months ago
 -
 vanillapocketwatch reblogged this · 2 months ago
 -
 idakbie reblogged this · 3 months ago
 -
 madeofa-brokenstone reblogged this · 3 months ago
 -
 pointeful liked this · 3 months ago
 -
 impulsive-aroace reblogged this · 3 months ago
 -
impulsive-aroace liked this · 3 months ago

I mostly reblog writing and art related resources here. BLMMy main account is FoofsterRoonie. My art blog is FoofsterArtAnd my writing blog is Foofsterwriting:)
197 posts