Commissioner: “So, You Know What A Cat Looks Like, Right?” Artist:“.. Yes.”

Commissioner: “So, you know what a cat looks like, right?” Artist:“.. yes.”
More Posts from Like-luke-likes and Others
omfg
only on tumblr can someone with a human pet fetish give 19th century monarch style political hot takes
this is the worst day ever so this guy offers me to bathe in this new fangled bathtub and im taking the bath and its cool and the motherfucker starts chopping carrots in it. go do that somewhere else.


i’m not overly protective of star wars but when people say to watch the prequels first for story purposes I cringe because no no no you gotta watch it 4 5 6 1 2 3 okay
so since my last snap off blade is officially rusted, covered in plaster, and extremely dull I’m investing in that Opinel…and they have an engraving option.
I know rationally I should put my name on it or something but

Receding objects in perspective.

Have you ever been trying to draw tiles on a wall or on the floor in perspective, but notice that after you’ve drawn them, they don’t look like they’re all the same shape or size? Well here’s a tutorial on how to fix that. Your picture probably looks like this, right?

Well, i’m here to tell you how to fix that…Let’s start out with your basics.

The gray line is the horizon line, and the black dot is your horizon line. These are essential for the first steps of perspective. Without these, your perspective may turn out wonky and just not flattering to the eyes. Right now we’ll work in One point perspective.

Now let’s pretend we’ll be drawing a hallway. Draw a vertical line where the edge of the wall is.

Now, from the tips of the bottom and top of your wall, you’re going to need to draw a line extending all the way to the vanishing point. If you’re working in photoshop you could either use the line tool, or shift+click. If traditional, you’ll need to use a ruler.

Now that we have the wall that’s in perspective, it’s time to draw the rest of the lines. here I’ve drawn the wall facing us that’s closest, the ceiling, the floor line, and the end of the hallway. ASSUMING that you are working in one point perspective, all vertical lines are straight and parallel to each other, and all horizontal lines are straight and parallel to each other.

Now here I have erased the lines that extended beyond the back wall, and found the center point of the edge of the left wall. From there, you draw an extended line just as before towards your vanishing point.
now make a vertical line where your first “tile” is.


now this may be a little hard to explain. Now you’re going to draw a line coming from the corner of the wall, through the corner where your line meets the tile you just drew, and all the way to the ground line.
You see where these two lines meet? you’re going to draw a vertical line to the ceiling from here.

Like so!

Now rinse and repeat! you should have perfectly even spaced tiles now! And if you have tiles on the ceiling


Just draw horizontal lines connecting to the vertical lines!
Now just erase anyhing you don’t need and…viola! Perfect tiles in perspective!! I hope this helps!! :D


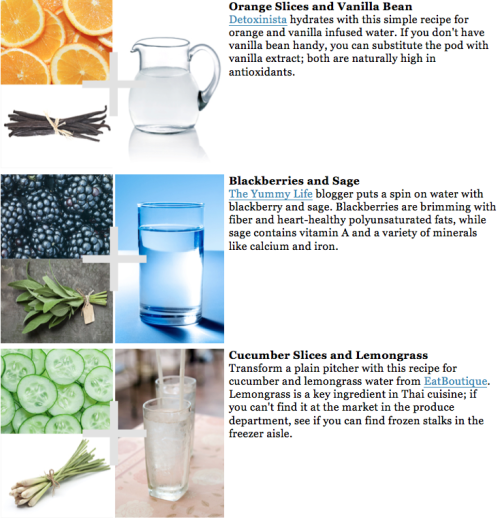
OMG OMG! LIKE DRINK YOUR WATER!
The 42 year old Englishwomen hoped that drinking more water would alleviate her headaches and poor digestion somewhat, but she never expected the additional benefits of staying well hydrated. The woman, who is known as Sarah, took a picture of herself before beginning her experiment and at one-week intervals for four weeks. In addition to her headaches disappearing before the end of the first week, her normally sluggish digestive system also began functioning normally.
The additional benefit that Sarah did not expect was a more youthful appearance. The dark circles and wrinkles around her eyes were completely gone after four weeks, and her usually dull skin appeared fresh and dewy. Although Sarah did not lose a lot of weight, she did lose two pounds, her waistline shrank by an inch and the cellulite she once had disappeared. Overall, Sarah says she looks and feels 10 years younger, and will continue drinking water at the same rate since realizing its benefits [X].

-
 starfruitzz liked this · 6 years ago
 -
 jstar-11 liked this · 7 years ago
 -
 certaineaglewagonthing liked this · 7 years ago
 -
 flowerssmellnice liked this · 7 years ago
 -
 lilbuddhash liked this · 7 years ago
 -
 l0rd-r0achy liked this · 7 years ago
 -
 i-enjoy-eating-sand liked this · 7 years ago
 -
 arkaneemerald reblogged this · 7 years ago
 -
 paintthetowncrazy reblogged this · 7 years ago
 -
paintthetowncrazy liked this · 7 years ago
-
 6idontlikemondays66-blog liked this · 7 years ago
 -
 r0chenn reblogged this · 7 years ago
 -
r0chenn liked this · 7 years ago
-
okrashan liked this · 7 years ago
-
 mycroftholmesxxl reblogged this · 7 years ago
 -
 closeencountersoftheretardedkind liked this · 7 years ago
 -
 ad-infinnitum reblogged this · 7 years ago
 -
ad-infinnitum liked this · 7 years ago
-
 blaruu liked this · 7 years ago
 -
 kat-france reblogged this · 7 years ago
 -
kat-france liked this · 7 years ago
-
 dying-but-still-trying reblogged this · 7 years ago
 -
 emma0emma liked this · 7 years ago
 -
 thestoryteller4 reblogged this · 7 years ago
 -
thestoryteller4 liked this · 7 years ago
-
kirbydude2654-blog liked this · 7 years ago
-
finewhateveridontcare liked this · 7 years ago
-
 not-finnick-odair liked this · 7 years ago
 -
 chiicken-soup liked this · 7 years ago
 -
 fuckingluckiedemon-blog liked this · 7 years ago
 -
 fetusbaby liked this · 7 years ago
 -
 citrineghost reblogged this · 7 years ago
 -
 tyskak liked this · 7 years ago
 -
 justanassloadofcatsreally reblogged this · 7 years ago
 -
 reis-im-backstage liked this · 7 years ago
 -
 honestlyidkpeople liked this · 7 years ago
 -
 zoomblez101 liked this · 7 years ago
 -
 immaflippingcookie liked this · 7 years ago
 -
 skrubmus-blog liked this · 7 years ago

Stuff I like that I reblog, and stuff that I post .... Luke
5K posts