Inktober Starts Tomorrow And I’m Starting To Get A Little Nervous.


Inktober starts tomorrow and i’m starting to get a little nervous.
but here is the prompt list i made in all it’s variations of tone, if anyone wants to use it feel free! @ me if you do so’s i can see it ^__^
More Posts from Itsmeif and Others


hope this tutorial helps, anon!! a lot of this is a result of experimentation and seeing what looks best based on your picture. what i’m essentially doing is relying on the overall “mood” bg colour tie everything together cohesively by putting the local colours over it on the “soft light” filter. the other changes i do, such as the blue light on him and the flavour elements are all based around making it more cohesive, e.g. the glow from the pool is all over the background AND the subject, instead of just the pool, pulling them together, if that makes sense!
of course this also relies on having some sense of what a realistic version of your scene would look like - for this comic i looked up “pool scenes night” on google to gather references i could take the colours from, and looked up lighting references for the way light would hit a face if coming from the bottom, stuff like that.
the other example is from a commission i did:

in this case, the lighting situation has a lot more light, and isn’t as atypical as pool-at-night lighting. so it was easier to rely on my usual method of colour layering, i.e.
local colour on multiply (as opposed to soft light)
monochrome shading on normal
again, experiment experiment experiment! hope this helps!


A Twitter thread of mine that I think some of you may find useful here as well! I’ll update this periodically when I update the Twitter thread.
Musings on the Night Lights

Judging by Zephyr’s apparent age, the epilogue takes place at least 8-10 years after Toothless and Hiccup separated. Dragons, in this universe, appear to age relatively quickly. Toothless is 15 in the first movie and based on his experience level, he seems to have been an adult for several years. From that, we can safely deduce that Furies probably take no longer than 10 years to reach maturity.
Now look at these little pumpkin pies. They’re obviously very young. They can fly (though rather haphazardly), but Gift of the Night Fury showed us that dragon nestlings can fly relatively soon after hatching. Therefore, we can conclude that these bundles of joy are likely under a year old. This brings us to one of two conclusions:
1) Furies’ breeding cycles are several years long, or they take many years to reach sexual maturity. Furies are rare dragons, and this could be attributed to the fact that many adults are killed before they are able to produce a significant number of offspring (as is the case in many real-world endangered species). This would explain why Toothless and the Light Fury only just now had babies.
Or…
2) This clutch of offspring is the latest of several, and Toothless and the Light Fury already have numerous adolescent/young adult Night Lights flying around the Hidden World causing mischief.

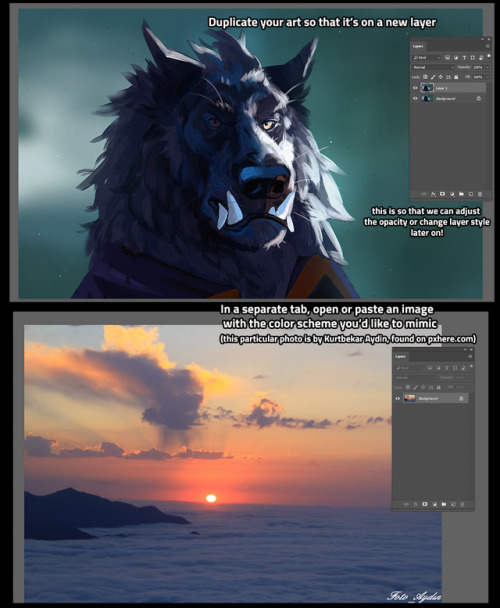
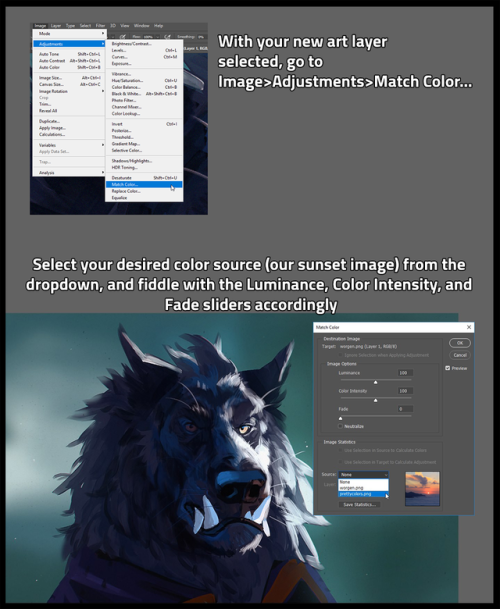
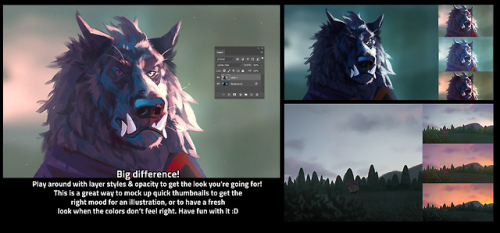
I’m sure a ton of people already know how to do this, but I only learned recently, so I wanted to share one of my favorite thumbnailing tricks! Color matching is SUPER helpful to quickly map out potential color schemes :D
[EDIT] this is in Adobe Photoshop, sorry for forgetting to mention that!


THUNDER THURSDAY #85: OpenToonz Tutorials Are Live!
Hey folks! For those wanting to learn OpenToonz, thanks again for your patience, and behold: my first few tutorials are online! Here’s the introductory collection (~35min total), or check below for links to individual sections :D
I’ve made a YouTube playlist with individual videos, and here are their separate links (times approximate):
Part 0: Introduction (2min)
Part 1: Installation (2min)
Part 2: The Startup Menu (2min)
Part 3: The Interface (3min)
Part 4: Levels & Drawing (7min)
Part 5: Drawing Frames (6min)
Part 6: The X Sheet (5min)
Part 7: Saving (2min)
Part 8: Exporting a GIF (7min)
ENJOY! And if you have questions, feel free to ask (either here, or in the YouTube comments). Thanks for watching!
Paul
Skull Oil Painting 💀 Still Life from Start to Finish

By Pavel Sokov
Setup and Preparation Stages
Before I start a painting, I like to come up with a couple of thumbnails to nail down the composition. I do these from imagination usually. So in these ones, I played with the placement of the skull, the direction of the lighting, and the orientation of the canvas. After coming up with these 4 thumbnail sketches, I got kind of a better idea of what I actually want from my painting.
Also, it sort of helps to have a thumbnail completed to use as reference when I start my painting because if I don’t have anything to look at it’s possible that when I start from scratch on my canvas, my subject will end up too big, or even worse, run off the page or something.

Composition is a bit of a feeling thing along with some guidelines. It’s not like stiff rules that you must follow. So having said that, I think I like sketch 1 and 3 the most.
You know, since the color temperature plays such a big role, I digitally painted this sketch with some invented color before actually making the setup, just to give an idea of what kind of mood this painting would be. And it also gave me an opportunity to plan some of the painting methods and steps that I’ll use in the actual painting process.


Okay, so with the sketches in mind, let’s put together the setup that I will paint from today.
Execution of the painting
So a big challenge to overcome here with this skull is that I want to paint it in the dark for a more dramatic and moody atmosphere since it’s Halloween and all, but at the same time, I want myself and my easel to be in the light so I can see and we can make this video.
Sadly, the candle doesn’t provide a strong enough light during the day, so we’re going to use a warm lamp instead.
Since we don’t want to burn the house down though by lighting that black box on fire, I think our candle shouldn’t be lit at the beginning stages of the painting.

I’m using a portable paintbox today that makes it convenient for me to paint anywhere I go.
For my brushes, I plan to use a lot of bristles because I want to load this painting up with a lot of thick paint, but I also packed a few softer brushes to get some soft edges in there too.
As my painting surface today, I am using an 11×14 linen panel. It’s actually one of my favorite sizes for life paintings.
I paint with a few different brands of oil paint, but there’s no need to name them or be concerned with what they are. What’s really important about that is that they’re professional grade and they’re not the student grade which are very difficult to paint with. It just doesn’t work, it’s like toothpaste, so just don’t even get it.
Okay, let’s squeeze out our paint. And don’t be afraid to use a lot. For the longest time, I’ve been so shy with squeezing out my paint. It’s been taking me years to paint thicket and thicker, and I gotta tell you, if you can skip all these years of being shy and just get straight into it and load up a lot of paint, it will save you a lot of trouble.
On my palette today we have:
Titanium White, Warm White, Cadmium Yellow Light, Cadmium Yellow Medium, Cadmium Yellow Orange,Yellow Ochre,Transparent Yellow Oxide, Cadmium Red, Transparent Red Oxide, Transparent Brown Oxide, Raw Umber, Alizarin Crimson, and Cobalt Blue.

Underpainting and Drawing Stage
The very first thing I like to do when starting a painting is to tint the canvas. But you have to select your tinting color wisely, because it’s going to provide the underlying temperature to the whole piece. I often let this initial tint show through all the way to the end of the painting, particularly in the shadows.

In this case we have a very warm light on our subject so we can expect our painting to be pretty warm. I’m going to tint this canvas with that in mind by using something really warm like transparent red oxide, and I will mix it with a bit of Cadmium Yellow Medium in the area where the candle will go because later, all this warm underpainting should give this skull a nice inner glow. I am diluting my paint with gamsol here when I do my initial washes, because makes the paint behave like a watercolor, which is perfect for making a stain.
Drawing the Lay-in
Okay, so now that our canvas is tinted, we can start to draw our linear lay-in on top of our stain. My favorite tool to do that with is actually a hard bristle brush. The reason why is that those stiff hairs, they allow me to get nice straight lines which are the exact type of lines that I find helpful at this stage to simplify the contours of everything that I’m drawing and to find those big shapes.
Don’t worry, we’re going to complicate these lines later when we go to paint them!
As you draw your lay-in, don’t forget to focus on the big shapes and the proportions of what you’re drawing. Don’t get carried away on details and things like that because it’s way too early at this stage. Simplify everything to its most basic elements. Find the big shapes and don’t mind the secondary forms for now. It also kind of helps to keep your horizon line in mind when you draw your lay-in. For example, in my case, I’m sitting below the skull and looking up at it.

You have to ask yourself, are you looking up at the your set-up, or are you looking down at it? And, whatever the answer is, you have to design your lines with that in mind.
So if you’re noticing that your drawing is off at this stage, don’t be shy to move lines around until you get it right. Trust me, you’re gonna be saving yourself a lot of headaches if you fix things at this early stage than if you try to fix them later on when you have a lot of opaque paint down on your painting.
So right now I’m filling in the dark shapes on my underpainting because I find that it helps me see my mistakes better when I fill in the big dark shapes. With these dark shapes filled in, it’s much easier to judge the distances on your drawing.
Opaque Painting Stage
At this point I often like to take a kneadable eraser, or more often a napkin, and rub out the lightest areas. This helps me establish the light source a lot sooner before I even lay down the opaque paint. Just make sure to do this before your stain is dry, or else you won’t be able to do it anymore. You usually have about 10 minutes max depending on your surface before your wash dries, so be careful.
My goal here is to establish the big values, shapes and color temperatures as soon as I can, so to do that, I am going to cover the entire skull with some opaque paint, aiming primarily to tell the story of the lighting that’s hitting our skull. I am thinking a lot about color temperature. Our primary light is warm, so I’m mindful that my the parts that are in the light are going to stay warm. Often times, students want to lighten an area, so they grab a bunch of white. White is actually the coldest color, so the result of that is that the value of the area goes up and it does become lighter, but at the same time, the temperature goes a lot colder.

This is actually great if your subject is in a cold light, like maybe a North lighting window. But in our case, our subject is in a warm light, so that’s no good for us. When you want to lighten an area that’s in the light, consider using a color to lighten that area. In this case, to lighten my mixtures, I’m going to include some cadmium yellow medium, cadmium yellow, and transparent yellow oxide in my light mixtures to keep it warm. But conversely, if you want to darken an area, a lot of students reach for the black to darken things, and that creates a cold mixture as well. Try darkening a shadow with a warm dark. Something like transparent red oxide, transparent brown oxide, or alizarin crimson.
While you’re putting down that initial opaque paint, a good principle to work by is to paint the lights thicker and the shadows a little bit thinner. So that means you can’t be afraid to lay down some serious paint in the lights. If you keep the shadows more thin and flat, then the lights are going to feel more luminous in comparison. And I also love to let my warm underpainting show through in places in the shadows.
When you have dramatic lighting like this, you are bound to see a lot of contrast. Let’s make sense of all of it this way:
Since most of our subject is lit, make sure that the amount of values you use in lights is higher than in the shadows. In other terms, make the shadows more flat and have less values, like you could make the shadows just one value so that it looks a lot simpler than your halftones and your lights. As a result, the shadows will have less information in it than the parts that are lit.
I am thinking of the skull as an egg, with the closest part receiving the most light, and the parts farther away receiving the least amount of light. If the underlying “egg” of the skull reads well, then you are gonna be in good shape!

Our halftones are the most chromatic and the most information-dense parts. So in our case they are going to be the warmest parts of the skull. The lightest lights are pretty washed out, but they’re still warm.
Finishing Stage
To see the finishing touches make sure to watch the video below.


Night Lights! I love them. The white one and the black one with the black nose are my favorites. I hc them as male and female respectively. Also Ummm look at this screenshot below the cut?
Keep reading


It’s 11:21 pm, isn’t it??
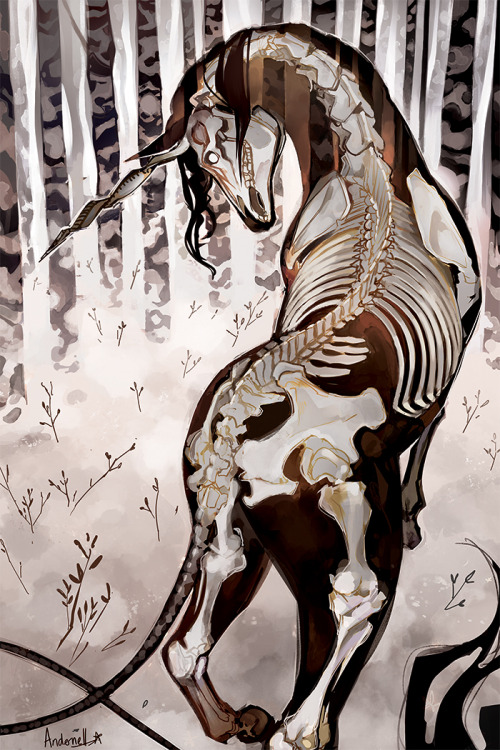

My piece for the @monoceroszine project! Was a pleasure to work along side some amazing artists and writers!
-
 wormprincebastard reblogged this · 6 months ago
 -
 docescene reblogged this · 10 months ago
 -
 jocey-creative liked this · 11 months ago
 -
 royalsreferencearchive reblogged this · 1 year ago
 -
 tamobomb001 liked this · 1 year ago
 -
 gaydino1 liked this · 1 year ago
 -
 kaylaartinspo reblogged this · 1 year ago
 -
 squishyfauna reblogged this · 1 year ago
 -
 foxfairytailsarchive liked this · 1 year ago
 -
 fleur-dans-la-nuit liked this · 1 year ago
 -
 thedomomonsta liked this · 1 year ago
 -
 nemmet liked this · 1 year ago
 -
 pepperminttea90 liked this · 1 year ago
 -
 satsukidoodles404 liked this · 1 year ago
 -
 rachel-of-autumnbow liked this · 1 year ago
 -
 chaosblanket liked this · 1 year ago
 -
 insomnianoctem liked this · 1 year ago
 -
 cybu09 liked this · 1 year ago
 -
 its-spice liked this · 1 year ago
 -
 topplongclixgas liked this · 1 year ago
 -
 pineappleprincess0604 liked this · 1 year ago
 -
 3lahh liked this · 2 years ago
 -
 theblossomingthoughtproject liked this · 2 years ago
 -
 frogcodimg liked this · 2 years ago
 -
 spacebugarts liked this · 2 years ago
 -
 sayjoisme84 reblogged this · 2 years ago
 -
ilavenderhoneyi liked this · 2 years ago
-
 railovesskz liked this · 2 years ago
 -
 fuzzyfaceofwinter liked this · 2 years ago
 -
 lostforestfriend liked this · 2 years ago
 -
 vibafleischer liked this · 2 years ago
 -
 theophagism liked this · 2 years ago
 -
 ancientbread liked this · 2 years ago
 -
 ideasthatwillneverbepublished liked this · 2 years ago
 -
 theyoungwaldschrat reblogged this · 2 years ago
 -
 snowlily5150 liked this · 2 years ago
 -
 fungus-father liked this · 2 years ago
 -
 barbarella1968 liked this · 2 years ago
 -
 wulfiestired liked this · 2 years ago
 -
 avensdesora liked this · 2 years ago
 -
 shewooolf liked this · 2 years ago
 -
 sillylittlemann liked this · 2 years ago
 -
 meansugay liked this · 2 years ago
 -
 stuffedbare liked this · 2 years ago
