The Official Hazbin Hotel Twitter Just Released These Character Bios. I’ll Post Again If They Upload


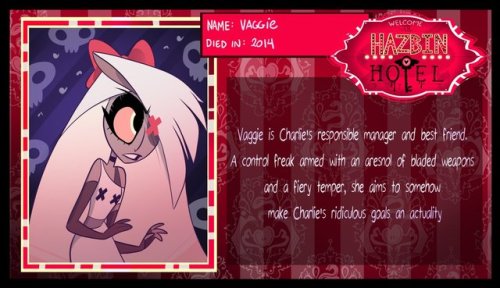


The official Hazbin Hotel twitter just released these character bios. I’ll post again if they upload any more
More Posts from Itsmeif and Others
Burning Matches Chapter 1 Of New Sights and Colors
Link will be included in a reblog to the AO3 site, Cross-Posted from ,my account on AO3: HopelesslyLost
___________________________________________________
It was horrifying. It was dizzying. His mind spiraled in a million different directions, his body pressing against hard concrete as he desperately attempted to draw breath into his lungs, fingers scrabbling at the building, seeking something, anything that he could use to ground himself. He closed his eyes, tilting his head back, trying to focus on the roughness of the concrete that he could feel, ripping his gloves off in order to be that much closer, barely remembering to shove them in a pocket as he did so. He didn’t even notice the fact that his fingers had dug into the rough edges to the point where they were starting to bleed.
His breath was still rattling in his lungs, his body still tense, but if he kept his eyelids closed, he could at least pretend that nothing had changed.
What had happened?
One moment, Peter had been swinging after some two-bit crooks, intent on putting them on ice after they had shot up one of the poorer localities…and in Hooverville, that was saying something. The next, he had somehow swung into something that squeezed him tighter than the Sandman, and hit harder, too. When he finally was spat out of whatever it was that caught him, he found himself here. This…this…
Peter didn’t know what this was. He didn’t know what was surrounding him, had no idea what was happening, why he was here, where here even was! What was happening? Slowly, slowly, Peter peered out through his goggles, his eyes squinted as narrow as he could make them and still be able to see.
It was like an icepick was driving into his skull.
Peter closed his eyes again, heaving a breath in, and letting it whistle out.
Keep reading

Takes more than combat gear to make a man
Takes more than a license for a gun
Confront your enemies, avoid them when you can
A gentleman will walk but never run
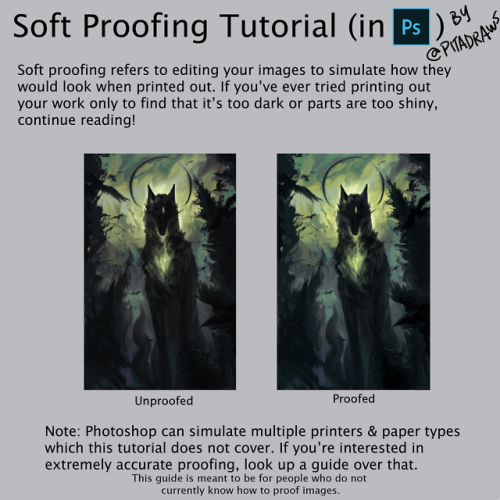


Was getting some of my images ready to be made into prints today so I thought I’d make a guide for anyone else interested in making prints of their work :D


Rabidraygun and I made a game last weekend for Full Moon Game Jam! She did the programming and I did the art :D It’s a 2 player co-op game (you can also play solo) about a kid who’s afraid of the dark trying to meet up with her ghost bud that can’t go into the light. Check it out on itch.io here!
Spider-gang into the MCU Headcanons part 2
- Tony Stark would accidentally offend Peni and Ham a few times for their “style”. Less so with Noir.
- Peni and Shuri would be besties, learning about each other’s tech. Shuri would offer to upgrade Sp//dr’s armor with vibranium but Peni would decline as she wants to keep honouring her father.
- When Dr Strange approached the Spiders because of their dimensional travelling, Miles points out how the Cloak of Levitation reminds of one of the suits in RIPeter’s basement, leaving the good doctor confused.
- When MCU!Peter finds out who Miles’s uncle is, he talked to Miles about his encounter with Aaron Davis back in Homecoming. While a bit surprised and worried that his uncle in this universe is still a criminal of sorts, he is glad that his uncle in this universe still seemed like he cares about his family.
- Miles at one point caught this universe’s version of his uncle doing a small crime but eventually let’s him go after taking back what he stole.
- Gwen and Peter B teased MCU!Peter at least a few times about his MJ, leaving Peter in an absolute mess.
- After Peter B mentioned stopping a runaway train to Tony, Tony adds “stopping a runaway train” to MCU!Peter’s list of accomplishments needed to be fulfilled before the kid is ready for the Avengers, aside from graduating from high school.
- Pepper would sometimes ask Peter B about MJ and the two bond about their desires on starting a family with their significant other.
- Peter B’s utter confusion over MCU!Flash Thompson looking the way he is. MCU!Peter is surprised when Peter B mentioned Flash being a bit more a physical bully back in the day.
- Whenever someone tries to hit on MCU!Aunt May, they would receive threatening glares from the other Spiders.
- Ned wonders if Sp//dr has a bigger mech form or combines with other mechs much to Peni’s dismay.
- A few of Tony’s unused armor gets damaged heavily in a sparring match against Spider-Ham. The others hold back but Tony notes they definitely seemed to be more experienced fighters in comparison to MCU!Peter, even Miles, much to Peter’s dismay.
- Peni once got bored enough to hack into Tony’s computer.
- Noir reminds Tony of Captain America when he mentioned punching Nazis.
Skull Oil Painting 💀 Still Life from Start to Finish

By Pavel Sokov
Setup and Preparation Stages
Before I start a painting, I like to come up with a couple of thumbnails to nail down the composition. I do these from imagination usually. So in these ones, I played with the placement of the skull, the direction of the lighting, and the orientation of the canvas. After coming up with these 4 thumbnail sketches, I got kind of a better idea of what I actually want from my painting.
Also, it sort of helps to have a thumbnail completed to use as reference when I start my painting because if I don’t have anything to look at it’s possible that when I start from scratch on my canvas, my subject will end up too big, or even worse, run off the page or something.

Composition is a bit of a feeling thing along with some guidelines. It’s not like stiff rules that you must follow. So having said that, I think I like sketch 1 and 3 the most.
You know, since the color temperature plays such a big role, I digitally painted this sketch with some invented color before actually making the setup, just to give an idea of what kind of mood this painting would be. And it also gave me an opportunity to plan some of the painting methods and steps that I’ll use in the actual painting process.


Okay, so with the sketches in mind, let’s put together the setup that I will paint from today.
Execution of the painting
So a big challenge to overcome here with this skull is that I want to paint it in the dark for a more dramatic and moody atmosphere since it’s Halloween and all, but at the same time, I want myself and my easel to be in the light so I can see and we can make this video.
Sadly, the candle doesn’t provide a strong enough light during the day, so we’re going to use a warm lamp instead.
Since we don’t want to burn the house down though by lighting that black box on fire, I think our candle shouldn’t be lit at the beginning stages of the painting.

I’m using a portable paintbox today that makes it convenient for me to paint anywhere I go.
For my brushes, I plan to use a lot of bristles because I want to load this painting up with a lot of thick paint, but I also packed a few softer brushes to get some soft edges in there too.
As my painting surface today, I am using an 11×14 linen panel. It’s actually one of my favorite sizes for life paintings.
I paint with a few different brands of oil paint, but there’s no need to name them or be concerned with what they are. What’s really important about that is that they’re professional grade and they’re not the student grade which are very difficult to paint with. It just doesn’t work, it’s like toothpaste, so just don’t even get it.
Okay, let’s squeeze out our paint. And don’t be afraid to use a lot. For the longest time, I’ve been so shy with squeezing out my paint. It’s been taking me years to paint thicket and thicker, and I gotta tell you, if you can skip all these years of being shy and just get straight into it and load up a lot of paint, it will save you a lot of trouble.
On my palette today we have:
Titanium White, Warm White, Cadmium Yellow Light, Cadmium Yellow Medium, Cadmium Yellow Orange,Yellow Ochre,Transparent Yellow Oxide, Cadmium Red, Transparent Red Oxide, Transparent Brown Oxide, Raw Umber, Alizarin Crimson, and Cobalt Blue.

Underpainting and Drawing Stage
The very first thing I like to do when starting a painting is to tint the canvas. But you have to select your tinting color wisely, because it’s going to provide the underlying temperature to the whole piece. I often let this initial tint show through all the way to the end of the painting, particularly in the shadows.

In this case we have a very warm light on our subject so we can expect our painting to be pretty warm. I’m going to tint this canvas with that in mind by using something really warm like transparent red oxide, and I will mix it with a bit of Cadmium Yellow Medium in the area where the candle will go because later, all this warm underpainting should give this skull a nice inner glow. I am diluting my paint with gamsol here when I do my initial washes, because makes the paint behave like a watercolor, which is perfect for making a stain.
Drawing the Lay-in
Okay, so now that our canvas is tinted, we can start to draw our linear lay-in on top of our stain. My favorite tool to do that with is actually a hard bristle brush. The reason why is that those stiff hairs, they allow me to get nice straight lines which are the exact type of lines that I find helpful at this stage to simplify the contours of everything that I’m drawing and to find those big shapes.
Don’t worry, we’re going to complicate these lines later when we go to paint them!
As you draw your lay-in, don’t forget to focus on the big shapes and the proportions of what you’re drawing. Don’t get carried away on details and things like that because it’s way too early at this stage. Simplify everything to its most basic elements. Find the big shapes and don’t mind the secondary forms for now. It also kind of helps to keep your horizon line in mind when you draw your lay-in. For example, in my case, I’m sitting below the skull and looking up at it.

You have to ask yourself, are you looking up at the your set-up, or are you looking down at it? And, whatever the answer is, you have to design your lines with that in mind.
So if you’re noticing that your drawing is off at this stage, don’t be shy to move lines around until you get it right. Trust me, you’re gonna be saving yourself a lot of headaches if you fix things at this early stage than if you try to fix them later on when you have a lot of opaque paint down on your painting.
So right now I’m filling in the dark shapes on my underpainting because I find that it helps me see my mistakes better when I fill in the big dark shapes. With these dark shapes filled in, it’s much easier to judge the distances on your drawing.
Opaque Painting Stage
At this point I often like to take a kneadable eraser, or more often a napkin, and rub out the lightest areas. This helps me establish the light source a lot sooner before I even lay down the opaque paint. Just make sure to do this before your stain is dry, or else you won’t be able to do it anymore. You usually have about 10 minutes max depending on your surface before your wash dries, so be careful.
My goal here is to establish the big values, shapes and color temperatures as soon as I can, so to do that, I am going to cover the entire skull with some opaque paint, aiming primarily to tell the story of the lighting that’s hitting our skull. I am thinking a lot about color temperature. Our primary light is warm, so I’m mindful that my the parts that are in the light are going to stay warm. Often times, students want to lighten an area, so they grab a bunch of white. White is actually the coldest color, so the result of that is that the value of the area goes up and it does become lighter, but at the same time, the temperature goes a lot colder.

This is actually great if your subject is in a cold light, like maybe a North lighting window. But in our case, our subject is in a warm light, so that’s no good for us. When you want to lighten an area that’s in the light, consider using a color to lighten that area. In this case, to lighten my mixtures, I’m going to include some cadmium yellow medium, cadmium yellow, and transparent yellow oxide in my light mixtures to keep it warm. But conversely, if you want to darken an area, a lot of students reach for the black to darken things, and that creates a cold mixture as well. Try darkening a shadow with a warm dark. Something like transparent red oxide, transparent brown oxide, or alizarin crimson.
While you’re putting down that initial opaque paint, a good principle to work by is to paint the lights thicker and the shadows a little bit thinner. So that means you can’t be afraid to lay down some serious paint in the lights. If you keep the shadows more thin and flat, then the lights are going to feel more luminous in comparison. And I also love to let my warm underpainting show through in places in the shadows.
When you have dramatic lighting like this, you are bound to see a lot of contrast. Let’s make sense of all of it this way:
Since most of our subject is lit, make sure that the amount of values you use in lights is higher than in the shadows. In other terms, make the shadows more flat and have less values, like you could make the shadows just one value so that it looks a lot simpler than your halftones and your lights. As a result, the shadows will have less information in it than the parts that are lit.
I am thinking of the skull as an egg, with the closest part receiving the most light, and the parts farther away receiving the least amount of light. If the underlying “egg” of the skull reads well, then you are gonna be in good shape!

Our halftones are the most chromatic and the most information-dense parts. So in our case they are going to be the warmest parts of the skull. The lightest lights are pretty washed out, but they’re still warm.
Finishing Stage
To see the finishing touches make sure to watch the video below.


Candle Tutorial by slagbjorn.art
Support the artist and check out their prints!

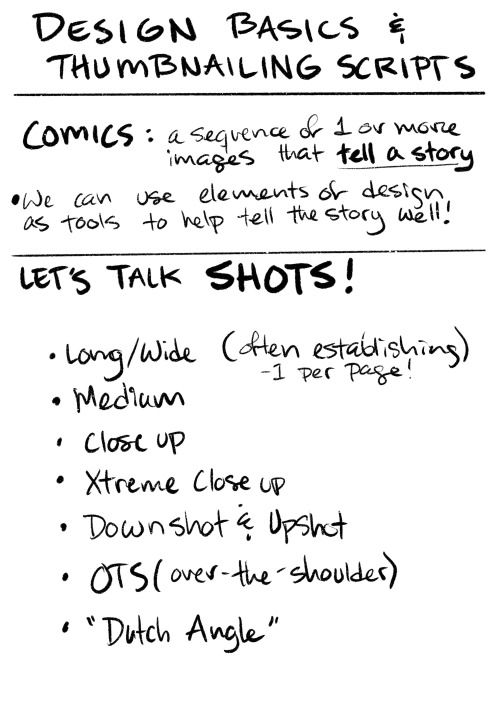


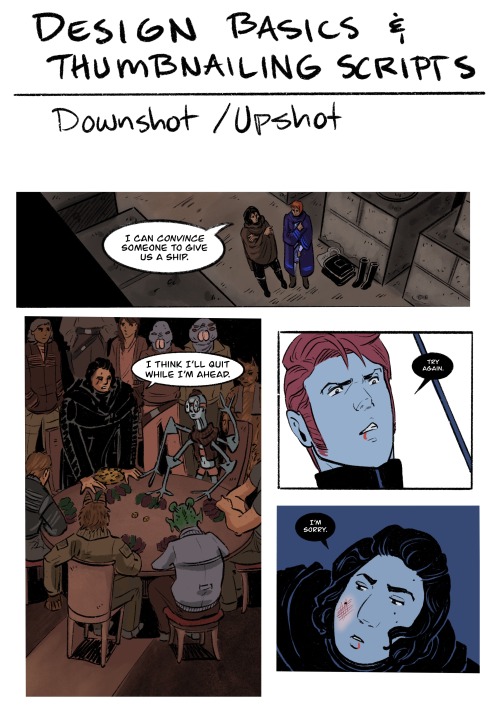
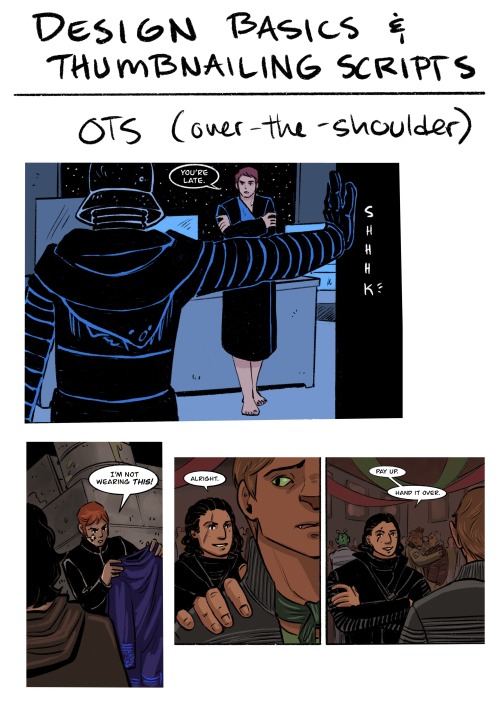
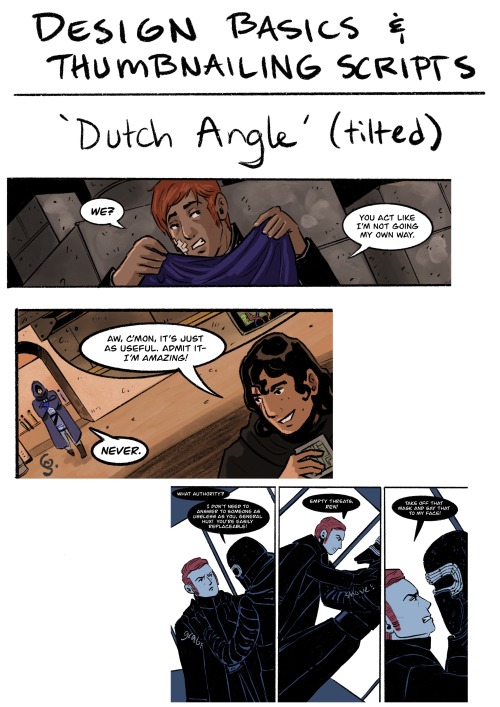
Part 1 of my Design and Layout for Comics lecture!
Here’s part 2: https://gingersnappish.tumblr.com/post/614575142440517632/part-2-of-my-design-and-layout-for-comics-lecture


read the full comic!
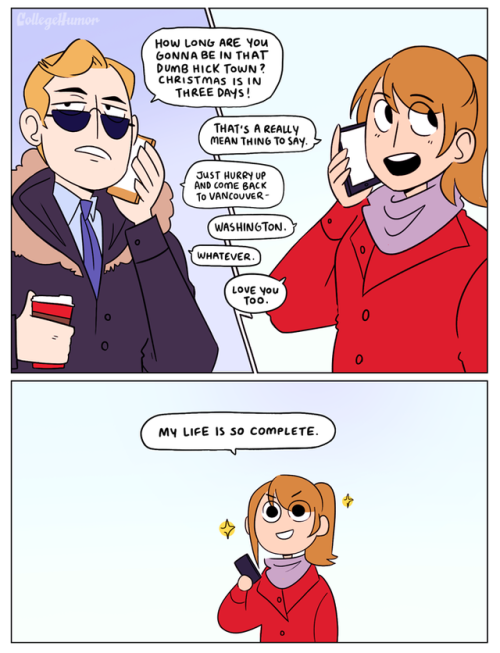
i have watched approximately 54535624664534 of these so here is my Ode to Hallmark Christmas Movies
-
 zzz-naptime liked this · 1 month ago
 -
 briefdreamerbasketballmuffin liked this · 9 months ago
 -
 dlthecat03 liked this · 1 year ago
 -
 rockinmomo reblogged this · 1 year ago
 -
rockinmomo liked this · 1 year ago
-
 fannishcodex liked this · 1 year ago
 -
 fudgeandpeanutbrittle liked this · 1 year ago
 -
 spadewalker1 reblogged this · 1 year ago
 -
spadewalker1 liked this · 1 year ago
-
 xandamonium liked this · 1 year ago
 -
 justanidiotartist liked this · 1 year ago
 -
 wambatt liked this · 1 year ago
 -
 big-scary-bird liked this · 2 years ago
 -
 thecakeisimportant liked this · 3 years ago
 -
 dinosauruswreck liked this · 3 years ago
 -
 memelordintraining liked this · 3 years ago
 -
 broadwayfangirl222 liked this · 3 years ago
 -
 gabenath14 liked this · 3 years ago
 -
 lizzybugsblog liked this · 3 years ago
 -
 bluekiddosblog liked this · 3 years ago
 -
 shathet liked this · 3 years ago
 -
 bwingus liked this · 3 years ago
 -
 imnotadogiswear liked this · 3 years ago
 -
 mr-danganronpa reblogged this · 3 years ago
 -
mr-danganronpa liked this · 3 years ago
-
 purplebingo liked this · 3 years ago
 -
 funnywiccan liked this · 3 years ago
 -
 arunningjoke liked this · 3 years ago
 -
 critterchitters-closedcaptions reblogged this · 3 years ago
 -
critterchitters-closedcaptions liked this · 3 years ago
-
 hikarimainblog liked this · 3 years ago
 -
 themagicwolf6677 liked this · 3 years ago
 -
 snailorbee reblogged this · 3 years ago
 -
 jazzsumblr liked this · 4 years ago
 -
 freedomwolfgaming liked this · 4 years ago
 -
 paintys-palette liked this · 4 years ago
