Seeing The Photos From Webb Up Against Photos From Hubble Just Makes Me… I Don’t Even Know Like,
seeing the photos from Webb up against photos from Hubble just makes me… I don’t even know like, wow! Look at that!


More Posts from Donutdomain and Others
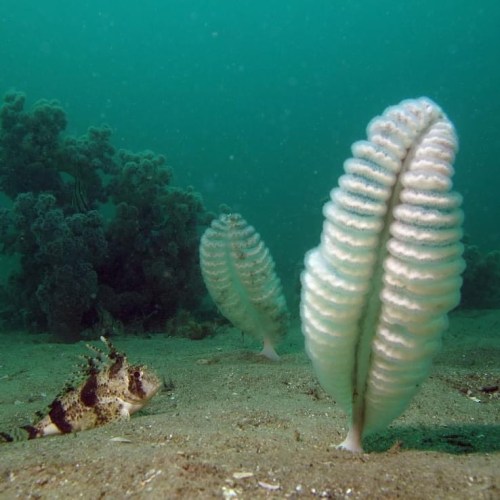
Did you know? There are about 300 species of sea pens that can be found swaying on the ocean floor around the world.🪶
You might be surprised to find out that this feather-like structure is actually a colony of polyps that work together to survive. Different polyps have different responsibilities depending on their location on the body. There are feeding polyps that catch plankton, as well as polyps that circulate water to keep the colony balanced and upright.
Photo: Richard Ling, CC BY-NC-ND 2.0, flickr; kidney sea pens (Sarcoptilus grandis) pictured
#AnimalFacts #OceanLife #SeaPen #Ocean #nature #fish #dyk #MarineLife #MarineBiology https://www.instagram.com/p/Cb_UKlsLemR/?utm_medium=tumblr

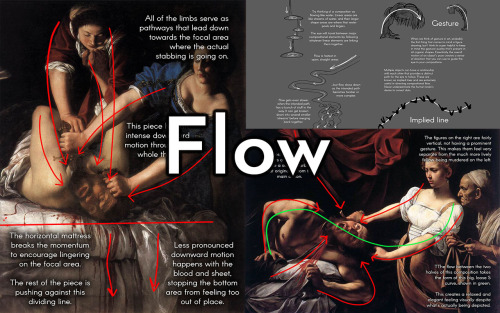
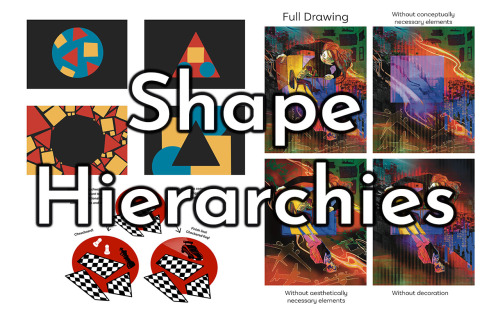
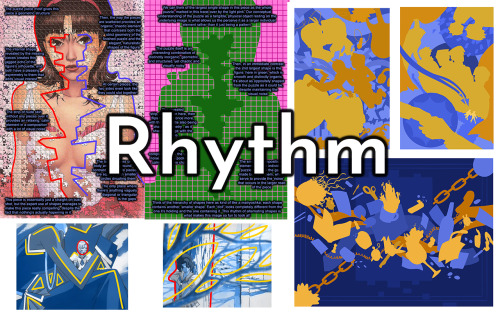
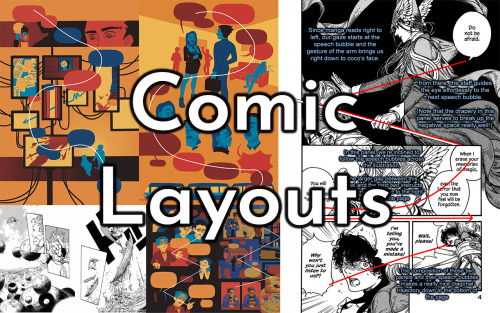
Hello everyone! after a couple of months of work on this beast of a thing, the first draft of my promised writeup on understanding composition is finally ready! This badboy is almost 15,000 words, and over 150 pages long. In these images, you can see a couple of examples of the kind of subject matter I’ll be covering, but it’s very comprehensive.
This is currently available on my Patreon starting at just $2!
I think what I offer is a pretty unique take on composition, and it’s geared to be understood without a lot of consideration for the more finnicky technical elements of drawing, so if that’s part of art you have trouble with you might find some answers in my approach. Using my own art and examples from various disciplines and eras, I break down how to understand why a composition does - or doesn’t - work, all building to a toolset that lets you have control over your own compositions with precision and intent.
A sincere thank you to anyone who takes the time to look at it, and at the end of the day, always remember one fundamental rule of art:


Art Tips for Vibrant Lighting
Some tips and tricks for getting glowy, beautiful, vibrant lighting effects…especially in traditional art, with no ctrl+z! The example piece is a watercolor work in progress of mine and, if you’re familiar with watercolor, you know it’s super unforgiving. What you put down stays!
Tip 1: Create a thumbnail

Do a very loose, messy sketch of your illustration. This helps define the composition, but it can also help you pick where your light is coming from and what colors you’ll use for it. This way, you can reference the light source and colors while you’re painting!
Even if you’re working digitally, this creates a great color key you can turn back to. You can make a thumbnail digitally or traditionally.
This thumbnail only took about 20 minutes…and it’s saved so many headaches during the painting process.
When you have a thumbnail, the rest of your painting is just a translation of those colors with a better technique.
Tips:
Feel free to make many thumbnails! This is the easiest step to revise and repeat.
Use a photo for inspiration for your color scheme. I used clouds in the evening as color references.
Play around with layers and effects (like overlay, multiply). This can help you figure out new colors that you can then try to capture traditionally!
Tip 2: Don’t forget about your lines!

Line art is important for gradients! I did mine first, so I had to consider the glow effect too. It’s a bit blurry (as its a screenshot from a reel, lol), but you can see yellows to dark browns and blacks. This established the glow from the start!
Tips:
Consider using a media you can get gradients in. I used acryla gouache here, but ink, watercolor, and even markers can work well!
If it’s hard to visualize highlights in line art, do the lines after with pen or paint! Adding shadows and highlights that way can be easier.
Tip 3: Start with big gradients first

Once you have your sketch on paper finished, start with large gradients! This helps define your light source and keep your whole composition making sense.
Here, I started with the background sky, then added in the shadow coming off the wing before doing anything else. Take note of how helpful the thumbnail was in helping me lay this all out, too!
Tip 4: Think warm to cool

See how both the hair and wings move from warm (yellow/browns) to cool colors (blues, payne’s grey)? This is a surefire way to keep the strong light source and make it look like the light is glowing!
Tips:
This is all about keeping the colors close to your light source, so if your light source is cool (like the moon), your highlights are cool and your shadows are warm tones. The key is just to keep it consistent!
Lighting isn’t just light to dark gradients. It’s also warm to cool/cool to warm!
Think about all the spots the light catches (like that one front feather on the left top). It takes a lot of thinking through, but it’ll make a huge impact! (Remember, you can always revisit your thumbnail or add more details in there)
Don’t forget about reflected light, bouncing off another surface. It’ll be more subtle than the main light source, but still there!

Final Tips:
Love those gradients! Watercolor is meant for beautiful gradients, so use multiple colors for a glow. The feathers in the light go from yellow ochre to prussian blue to payne’s grey.
Start with the highlights first, then work into the shadows! Above, the skin isn’t even painted with shadows yet, because I wanted to get the lighting first.
This is just a WIP right now, but I hope these tips help! If you want to follow, I’ll be posting more progress pics (and the finished illustration soon too). :D
My: Instagram | Twitter

i learned that the Sun is 99.86% of all mass in our solar system. Every other planet, asteroid, and comet only adds up to 7/50th of a single percent (x)


Some people asked how I paint hair, so I made this very simplified explanation, but I hope it helps someone.
The @ is my twitter btw ^~

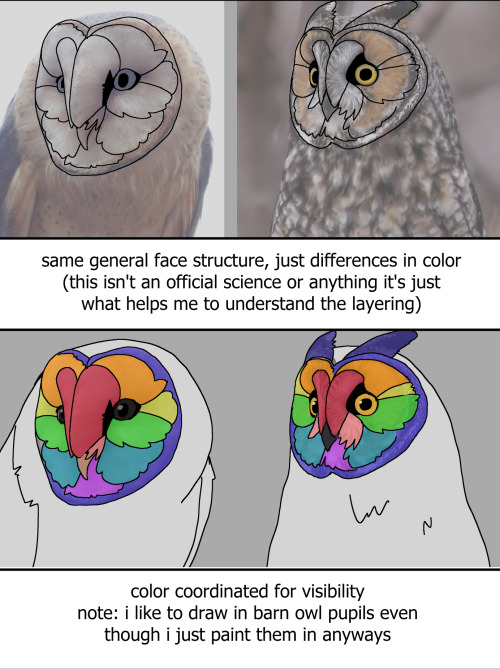

some vaguely coherent notes on owl facial discs because they were the hardest part of the bird for me to figure out and if this helps at least one person then I consider that an epic win
Photos: Barn Owl, Long-eared Owl


a digital artist’s guide to digital art guides
hi my qualification for writing this guide to youtube art tutorials (though it may be applicable to other forms of media as well) is that i have watched over (roughly) 200 art tutorials of various length, artistry, content, style, and more
when we’re told “look up guides online” there’s not really much more to say on how to approach our research and taking them in, so if you’re a little lost in the vast sea of art help like i was as a wee bab, then this may help!
General Use:
don’t feel bad for skipping - if something isn’t striking you as informative or helpful, don’t feel bad for moving right along and treating it like a sponsor
^ also applies for lengthy talking or deriving from the point, if you’re not up for it. you don’t need to sit through the artists’ whole spiel to learn how to draw hands.
if something isn’t making sense, reach out to communities for help, and go beyond youtube/tumblr. reddit and discord servers are also full of places to go to talk to more ppl
trust your gut! if someone’s style makes you go “hmm this feels wrong and objectifying”, it’s because it is - feel free to move right along
^ also applies for if it feels like the artist is just showing off and not explaining enough, or just posting for ego boost or to get coin.
… related tip but if an artist likes to rant about discourse as the primary thing on their channel, i know drama can be fun and juicy but please just avoid these people, because generally they’re either nasty and toxic-minded, or they seem to have some bs going on for them in the background
check out comments and online discussion to see how well received a popular artist is, and pay attention to their discourse to avoid any mistakes they unintentionally or even proudly display
the art program is not important!!! every art program has some level of similar functionality, some with more bells and whistles than others, and very rarely does one program lack a key tool the others don’t have. the hardest part is translating what your artist means when they say one thing but your program has another - but more often than not, some similar wording or like words are used for the same tool or setting.
^ this means you can watch that tutorial on how to draw legs for clip studio if all you have is firealpaca
Information over Entertainment! the best artists to find help in are ones who focus primarily on relaying information and less on colorful quirky editing - those kinds CAN be helpful, but in general i tend to find more useful tips in videos that feel more academic as opposed to more entertaining.
don’t feel bad for flatout ignoring advice. if you found something that works better for you, please use it. feel free to try new techniques as well if you’re feeling stuck or want a change of pace!
Terms and Conditions:
What words should you use when finding the right video? Think like a content creator, here. General words are best when searching for the right video, and in order to think of those words, you need to know the parts of art. Lines, anatomy, colors, values, background, perspective, etc - figure out which part or parts you struggle with, and use one term at a time.
What types of videos are for me? If you are a Fresh Brand New Baby Beginner Artist that doesn’t even know much about art letalone art programs, then stick to tutorials that are labelled “for beginners”. If you know your way around an art program but you’re still pretty new, then your average art tutorial should be most helpful. More entertaining artists should be ok to start with! If you know your way around art but not programs, look for “art program reviews”, then once you’ve picked one or a few to mess around with (though I really recommend one at a time), look for “(program name) intro to / introductory”. And if you are well aware of everything I’ve listed, then you’ll be needing “intermediary / intermediate” tutorials. These ones are best given by master artists who focus on academic presentation. If you’re a master, you don’t even need this tumblr post wyd 😂
3 Ways to Write Scene Transitions
Moving from one scene to another in your short story or novel can be challenging. If your plot spans more than a day or a week, you've got plenty of time to cover.
How do you transition your scenes without jumping over crucial plot points or making the pacing feel rushed?
There are a few tips you can try when you're facing this problem.
1. Tease What's to Come
Let's say you've started a chapter with your protagonist encountering people they don't like while shopping at the grocery store with their exhausted two-year-old. The experience is frustrating, so your protagonist is simmering while sitting at a red light on the way home.
The main action of the chapter happens when the babysitter arrives that night, but it's only 12 o'clock in your scene. You needed your protagonist to encounter the people that annoy them to establish motivation for the action later on.
You could jump time by teasing the action itself. Your protagonist could thrum their fingers on the steering wheel and glare at the red light.
They opened their arms to the resentment churning under their skin. It sank into their bones, morphing into electricity that kept [Protagonist] plodding through their day. The red light mocked their need to take action, but they could wait.
Because when the babysitter showed up that night, they would take their revenge out on the city.
That could be a great place for a scene break or even the end of your chapter, depending on how much you've written. The reader won't mind a time jump because their interest gets piqued. They'll want to know what revenge means for that character and what will spin out from the choices they make.
2. Switch Points of View
If you're writing a 3rd person POV story with perspectives from at least two characters, you can also transition scenes by switching narrators.
While one character completes a plot-relevant action, the other could move the plot along by being a bit further in the future.
Consider something like this as an example:
Sarah's heart beat wildly in her chest as the heavy words finally fell from her lips. It was just the two of them in that park, but it had felt like the whole world had watched her admit her love for Melanie in the molten gold rays of the setting sun. All she needed now was an answer.
[Scene break symbol or the start of a new chapter]
Melanie heard Sarah's heartfelt words echo in her ears long after she had mumbled something about needing time. Time to think, to process. Sarah had been so understanding, even when she dropped Melanie off at home right afterward and skipped their usual Facetime call that night.
It wasn't until Melanie woke up the next morning in a sweat that she realized she finally had to unearth her biggest secret—she had only started the friendship with Sarah because she'd been in love with Sarah's older sister since the second grade.
You could make that time jump into however long you needed. Play with the scene set up in particular and then give the page or two to whoever loves to read your writing. They could talk about if it felt like a rushed scene or if the time jump felt right for that moment.
3. Wrap Up the Moment
Most of the time, I find myself struggling with a scene transition because the moment that I'm writing isn't finished.
Recently I was writing a scene with two friends in a wagon on their way to a new city. They have a great conversation that sparks some character development in-between plot points, but I could feel that conversation coming to a lull.
It felt like the right moment to insert a transition, but something didn't feel right.
I had to walk away from my work and come back to it to realize that I needed to wrap up the moment to move anything forward.
The solution I found was ending the conversation by making them appreciate their friendship more than before, based on what had been said, and then the protagonist ended the scene by reflecting on how they knew they could face anything in the new city with their friend by their side.
The next scene started with their wagon approaching the city walls after a night of sleeping under the stars. The reader will still understand that it took more time to reach their destination, but they don't have to read excessive details about the cold night air or hard ground under the protagonist's back to get to what they're most looking forward to—the arrival at the new city.
Nothing about that night would add anything to the plot, so dropping the overnight experience at the beginning of the sentence makes for a great transition to the next scene.
Make Your Transitions Clear
Whether you end a scene with a cliffhanger, a heartfelt moment, or by switching between points of view, your transitions should always help the plot.
You can always edit them while reworking the finished draft later or ask for beta reader opinions from the people who always love reading what you write.
-
 future-viner liked this · 3 weeks ago
 -
 margocooper liked this · 3 weeks ago
 -
 mintbecrazy reblogged this · 3 weeks ago
 -
mintbecrazy liked this · 3 weeks ago
-
 raammpaggee liked this · 1 month ago
 -
 viktorsbedpartner reblogged this · 1 month ago
 -
 strawbebbyboba reblogged this · 1 month ago
 -
 ionas-idk liked this · 2 months ago
 -
 rhythmofherdrum liked this · 3 months ago
 -
 crispycoffeestudent reblogged this · 3 months ago
 -
 justiceandwar98 reblogged this · 3 months ago
 -
justiceandwar98 liked this · 3 months ago
-
 ittybi liked this · 3 months ago
 -
 cqsmic reblogged this · 3 months ago
 -
 no32557038 liked this · 3 months ago
 -
 eclecticcollections2 reblogged this · 3 months ago
 -
eclecticcollections2 liked this · 3 months ago
-
 sciencetidbitsarchive reblogged this · 3 months ago
 -
 liebestod-tchai liked this · 3 months ago
 -
 lime2342 reblogged this · 3 months ago
 -
 forgetme-eternally-blissfully reblogged this · 4 months ago
 -
forgetme-eternally-blissfully liked this · 4 months ago
-
 restfulldoll liked this · 4 months ago
 -
 jerzee55z liked this · 4 months ago
 -
 madmax76d reblogged this · 4 months ago
 -
madmax76d liked this · 4 months ago
-
 cronostitan liked this · 4 months ago
 -
 astat3ofgrac3 reblogged this · 4 months ago
 -
 xolboragainandagain liked this · 4 months ago
 -
 savythenillerwaffer liked this · 4 months ago
 -
 sleepystellarsister reblogged this · 5 months ago
 -
 stepsfrozenintime reblogged this · 5 months ago
 -
 annap5hg7 liked this · 5 months ago
 -
 annamnq7p liked this · 5 months ago
 -
 m0ssba11 liked this · 5 months ago
 -
 annat4rnh liked this · 6 months ago
 -
 annalgyrg liked this · 6 months ago
 -
 whythiskolaveridiii liked this · 6 months ago
 -
 annae4ev5 liked this · 6 months ago
 -
 a-mystic-sheep reblogged this · 6 months ago
 -
 unabashedpolicemilkshake liked this · 6 months ago
 -
 annaxdjzq liked this · 6 months ago
 -
 annita89blciekg8h liked this · 6 months ago

I just reblog fun facts/tipsScience, nature, geology facts etc! + art & writing tips!
67 posts